I've been busy knitting and felting wool, making matching Polymer Clay purse handles and buttons for them and am also getting requests from family members, a couple of whom I now know what to give for Christmas.
I had made crochet purses before with polymer clay handles like this. I don't normally do cute, but this one had a mind of its own! lol
Green and red...reminds me of...The Grinch that stole Christmas!! except he wouldn't have a flower on it...lol...unless someone insisted on making him happy!! A little play on the words...but my purse becomes Purrs...Grinch Purrs, I think its official.
The purse handles, I make them hollow, with a tough but slightly stretchy cord with just enough give to remove from the purse for which I sewed buttons on the outside this time. I've previously stitched the buttons to the inside, but what good is it to have decorative buttons that one can't see. Plus I stitched one to the center of the felted flower.
Anyway, the handles are removable so that the purse itself can be washed if necessary. I started making various other handles and matching buttons now that maybe available in kits soon with select chosen yarns...more on that soon, but here is a view of the "Grinch Purrs" for which I used Galway 100% Peruvian Wool as well as a touch of fun yarn.
I crocheted and felted the flower for which I dyed the orange wool with Kool-aid (mmm...and it smells like mandarin oranges!), then made a matching flower cane. The bright red was a toughy, but finally came up with a nice bright blend of cadmium red and fuschia.
Finished purse...the green looks a little washed out here....it is actually a Granny Smith Apple green...much yummier in person...but am thinking blueberry Seuss for the next, lol.
Nov 7, 2010
Nov 2, 2010
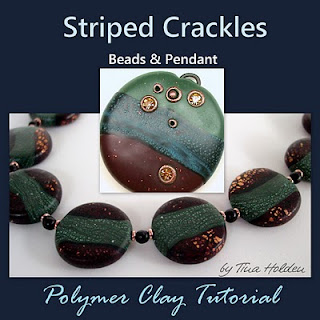
Polymer Clay E-Book - Striped Crackle Beads and Pendants - Tutorial
Shameless self-promotion, but what better way to announce that I have another polymer clay tutorial finished. So I am blogging about it here.
I tried counting the number of tutorials I have written (including a few beadwork and wire tutorials), but am having a hard time counting. I think this one will be the 33rd.
What is this latest tutorial about?
Striped Crackle Beads and Pendant. Essentially it is a 2 in 1 tutorial that is broken down into several parts. Learn in detailed guided step by step to make flat round beads with inclusions and a crackled banding and how to achieve fingerprint-less surfaces (found out that google doesn't like the word 'fr-ee' and wouldn't let me post that in my description, lol).
The bonus with this tutorial is to create a slight variation of a matching pendant that has accents and embellishment of swarovski crystal. You will also learn my method on inserting stones without the use of glue.
The tutorial has 51 photographs, 45 steps, and 17 pages. It's in my ArtFire Shop.
Oct 28, 2010
Felted Purses with Polymer clay Buttons
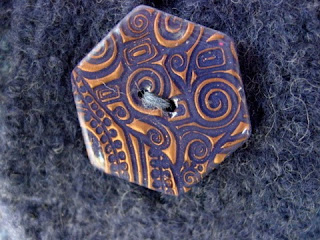
Here is a smaller felted purse, it's half the size of the one I showed in the last post. I love the hexagon shape for the polymer clay button that I covered with Resin. A friend recommended I should teach felting at the local yarn shop and how to make buttons.
I threw in one of my scrap clay heart pendants on this post. I have a few to list on my ArtFire. So many things to do, so little time...
Oct 26, 2010
Polymer Clay Shawl Pins, Buttons and Felted Purses
Finally am getting back into some creating, although not so much jewelry. I've been making a variety of Polymer Clay Buttons, Shawl pins and am knitting and felting purses!
Here are some of my Polymer Clay Shawl pins.
I also made two purses this week, but this large one took me about 4 long days to complete. It's a Hobo bag. My husband thought I was knitting a sweater because before felting and shrinking it, it was huge! I made coordinating button for it. I'll post photos of the smaller bag tomorrow and hopefully the baby booties I came up with for a friend who is expecting a baby soon.
This pattern is available from "Pipps Purses" on ArtFire. I had no idea what a Hobo Bag was, lol, but now I know!! It was trial and error following the pattern. One must definitely have an understanding of stitches as there are no photographs other than the finished purse. I knitted mine on circular needles in a knit one row, purl one row fashion instead of knitting all rows. I actually like the slightly rougher texture of the purse that resulted from that.
Here are some of my Polymer Clay Shawl pins.
I also made two purses this week, but this large one took me about 4 long days to complete. It's a Hobo bag. My husband thought I was knitting a sweater because before felting and shrinking it, it was huge! I made coordinating button for it. I'll post photos of the smaller bag tomorrow and hopefully the baby booties I came up with for a friend who is expecting a baby soon.
Labels:
buttons,
Felting,
shawl pins
Oct 5, 2010
A Suntan bed for my Polymer Clay
Fall has arrived and with it, shorter days, less sun and cooler temperatures. If you've been following my blog on Polymer Clay Bytes!, then you know I've been posting quite a bit about resin. I've been bemoaning my two nail art lamps that have been doing double duty and there have been many times with me running outside to quickly lay out a tray of pieces only for the sun to go into hiding.
The nail art lamps are quite reliable for Magic glos, but since I have a quart of industrial resin that I also like to use, unfortunately it also requires more lumen or output of light than the lamps could handle.
So check out this cool suntan bed my hubby built for me. I'm so stoked! It's fitted with 2 ballasts that hold 15 inch long BL 350 tubes . The plastic covers were removed and anchored inside an aluminum foil lined box. The aluminum helps reflect as much light as possible. The interior of the box can easily handle 40 pendants on its 9 x 18 inch area. I have two glass shelves that can be lowered and raised via 2 blocks for items with varying heights. Ideally, the resin cures best about 2 or 3 inches from the lights. There is a hinged door to close the unit as it's in close proximity to where I'm working. For these type of bulbs protective eyewear is recommended. I'll be sun tanning my clay a lot more now!
About my other lamps, the single bulb 9 Watt lamp has only a 2 x 6 inch area and the larger with four 9Watt bulbs has a 6 x 6 inch working area. Those lamps cost on average $35 for the small and $60 for the large, but sometimes Ebay has great deals. I guess I'll put mine into storage or find a hobby crafter who can use one or the other.
There is a lot more to UV these days than suntans and light bulbs. UV can cause chemical reactions, cause many substances to glow or flouresce such as when checking for biological hazards in public places or to detect counterfeit currency would be a couple of examples. UV wands for your purse are now available to kill bacteria if you are sensitive to chemical sanitizers and sprays. We all know the effects of UV by way of sunburns, but the UV spectrum has many other effects, both beneficial and damaging, to human health. You can read a lot more on Wikipedia about UV and Black Light and differences.
Anyway, a big thanks to my friend Gera Scott Chandler who first blogged about her home built UV lamp that reminds her off a Lunar Excursion Module and well, I kind of thought so as well, lol. Well, it IS complete with Space blanket! You can see Gera's innovative LEM lamp and an update is found here. In general, her blog is well worth the visit.
Oct 1, 2010
Japanese Polymer Clay Tile Tutorial is finished
I had a few requests for this polymer clay tutorial and am pleased to say that it is finally published.
This lesson shows you how to create unique polymer clay tiles with an offset and layered Japanese text. The layer is achieved with both metallics and ink and finally resin for an added, but optional dimensionality. Use these tiles for jewelry such as bracelets, earrings or pendants, however, you could create larger tiles for journal covers, boxes, or sheeted around tea lights, bottles of hope or anything else you can think of.
The step by step tutorial is 18 pages long, consists of 48 steps and had 55 detailed photographs to guide you from start to finish. You can find it in my ArtFire
Happy Friday!!
Labels:
Tutorial
Sep 30, 2010
Broken Polymer Clay Extruder Solution
I have two Makin's extruders for my polymer clay. I find Premo polymer clay the easiest to use with it because it tends to be much softer and less stressful on the extruder than some of the other brands. Makin's used to make the aluminum barrel one with an aluminum plunger and these broke very easily, so Makin's now makes them with a brass plunger that has an o-ring washer around it.
Here you can see the newer plunger above and the broken one.
The aluminum disc, where the plunger screw rod broke off, is still inside the barrel...and there was no way I was going to risk trying to get it out as the barrel / tube edges are very sharp.
The kits now also contain an extra washer that some are using for an unusual technique which is again putting unusual stresses on the Makin's and one would be better off using the stainless steel extruder for that. Also it could make your warranty void by using in a way than otherwise intended. But I digress. This topic is on fixing or making your broken extruder usable. While I do have a new extruder I had orginally kept the broken one just in case I needed the barrel, or whatever other part. I now use my broken extruder for dark clays and the newer on for lighter colours.
So how does one use a broken extruder? Remove the threaded end from the end where the broken disc is closest to the edge, like in Photo 2.
Next attach the wider screw cap over the threaded bolt unless it's already on there (photo 3). Insert threaded bolt onto broken aluminum disc.
Wind the thick screw cap down and fasten to the barrel.
Fill the other end with clay and attach extruder disc and narrow screw barrel end.
Extrude your clay!
When completely extruded your threaded bolt will be like above photo. Unscrew barrel ends and repeat process from photo 3 thru 9.
You could also use your broken extruder for unusual techniques instead of risking your good one...
Happy extruding!
Here you can see the newer plunger above and the broken one.
Photo 1 |
Photo 2 |
The kits now also contain an extra washer that some are using for an unusual technique which is again putting unusual stresses on the Makin's and one would be better off using the stainless steel extruder for that. Also it could make your warranty void by using in a way than otherwise intended. But I digress. This topic is on fixing or making your broken extruder usable. While I do have a new extruder I had orginally kept the broken one just in case I needed the barrel, or whatever other part. I now use my broken extruder for dark clays and the newer on for lighter colours.
Photo 3 |
Photo 4 |
Photo 5 |
Photo 6 |
Photo 7 |
Photo 8 |
Photo 9 |
You could also use your broken extruder for unusual techniques instead of risking your good one...
Happy extruding!
Sep 24, 2010
Polymer Clay Tutorial - Imitative Aged Bone Carvings by Tina Holden
I finally published the Imitative Aged Bone Carvings Tutorial for Polymer Clay enthusiasts.
This lesson is broken down into 6 parts. Learn by detailed step by step to make molds from objects and then create cabochons or pendants simulating antique ivory/bone carvings with realistic cracks and a worn appearance.
Some very basic materials and tools are required, i.e. no hard to obtain materials.
Even though the detailed photographic instructions should make this even accessable to a beginning clayer, I do recommend some knowledge in how to condition clay. If you need help with this, check my tutorials in the above tab.
Steps are broken down into these parts:
~Choosing an object and making a mold
~Creating a mold
~Mixing the ivory or bone clay color
~Making a copy from your mold
~Antiquing and cracks
~Worn and aged look
Tutorial is very detailed with 48 photos, 42 steps and 16 pages. Get it on my ArtFire or Etsy.
Sep 23, 2010
Polymer Clay and repurposing for some old items
Fall is here I have some Polymer Clay earrings to divide up to various shops and here is one pair. At first I wasn't too keen on the colours, but they kind of grew on me. I wish I had pierced ears. Can you imagine an earring lover not having pierced ears?
I still don't fancy clip ons as they hurt. And why don't I find the reassurance of others that piercing is painless. Does anyone remember when they had their ears pierced? I had mine done at age 2 when I didn't have a say and perhaps this caused my sensitivity to even 10 karat Gold. My right earlobe closed up as if it refused to have anything stuck through it. My left likes coated copper, but unless it becomes fashionable to wear one earring again.... I have a simple Hack coming up to solve this dilemma.
"a clever solution to a tricky problem or to hack is to mod or change something in an extraordinary way." Simply put...re-purposing.
What did I hack... my jacket! Sounds strange, doesn't it.It started when I looked at laptop sleeves on the net, most averaging at least $30. The one I fancied was $45 for my 15 inch Acer, never mind the shipping cost, another $10 bucks. It had a nice handle, but I wanted a clip on strap. Frugal as I am this had me thinking. Hindsight is, I should have taken photos of the process.
So, the original purpose was a jacket I had bought for $3, but it ended up sitting in my closet for more than a year...unused and now it's a jacket for my laptop which gets used all the time. The jacket was always a bit stiff and not as comfortable as it looked. Plus I didn't like the cuffs. The outer fleece is bonded to another layer of fleece, essentially reversible. Red on the outside, navy on the inside. I took one of the jacket pockets, angled it to be horizontal and stitched it on the outside. I can fit my USB stick in it, my ear buds, a CD and my battery charger/adapter. The flap is soft and tucks neatly inside the case. The strap is from another item I wear on my belt. I can detach it and slip the laptop into my backpack. I'm quite happy with my hack.
Sep 16, 2010
More Sunkissed Polymer Clay Designs
I'm thinking about the sun or lack thereof. My Polymer Clay Sunkissed Series requires UV and the two little lamps I have just don't cut it, but put the items out in the sun or as soon as you're ready to, the sun goes into hiding behind a temporary cloud. When using UV resin, even a 3 to 4 minute delay behind a cloud can make your resin stay sticky beyond repair depending on whether you can apply another layer. Anyway, I'm trying to do some resin batches every chance I get and keep watching the weather report. Wondering if I should take a whole bag full of ready pendants to Hawaii, lol.
Anyway, I heard that to prevent blog theft that I experienced for myself recently (a few posts back), I'm supposed to announce that I'm Tina and this is my blog, Polymer Clay Bytes! aka Beadcomber. Well, my followers know who I am, but a thief doesn't care and will just duplicate that post and put it elsewhere.
Anyway, about jewelry and polymer clay. I am enjoying making the Honeycomb Sunkissed pendants with Channels and cut outs...the channels are inspired by something Julie Picarello does with her famous mokume gane work. This is putting my own spin on things. If you want to learn my Honeycomb technique, go to my ArtFire shop...it's done in purple in the tutorial, but you can choose other colours. The Jupiter Pendants in the second photo are a spin ('xcuse the pun) on the spinning beads within pendants that I created around 2002 or 3...don't remember right now and would have to dig around in my other computer for the file. For the last photo, the earrings, I'm finally using some beautiful Turkish Turquoise chips that I purchased while in Germany in 1989 when my flirtation with Fimo began. 21 years ago...how time flies.
Subscribe to:
Posts (Atom)