It's been a while since I've blogged.
I guess with all the social media such as Facebook and Instagram, which are so easy to access and you can instantly chat with other people, get instant feedback and with a blog...well, one just doesn't know if anyone will even see or read it. Might make a good 'journal' tho? Will have to see if I can revive it...
But here's a test...if you see this, type a comment?
Also...hop on over to Beading Gem. I've got a Giveaway over there as well as a huge Coupon code!
https://www.beadinggem.com/2019/05/beadcombers-20-gift-certificate.html
Happy Creating!

May 28, 2019

Apr 5, 2017
Imitated Nature
For those that don’t know I love to recreate things found on the beach with polymer clay. That’s also where my choice of name ‘Beadcomber’ came from, beachcombing.
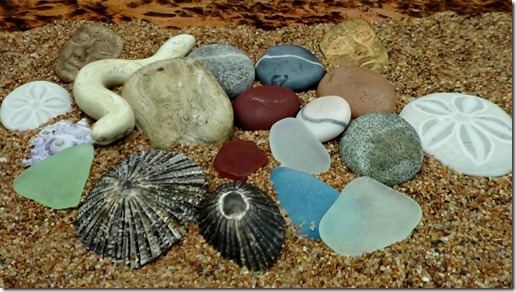
I know a couple of my pieces are missing from this photo, namely a sea star or starfish and a whole sea urchin, but I wanted to see how a group shot of my handmade bits would look like. Sea urchin piece, sea glass, driftwood, pebbles, shells and my most recent addition, sand dollar.
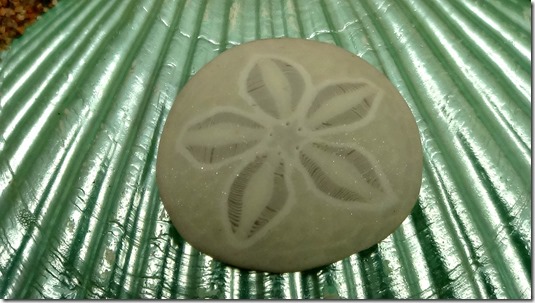
The Sea urchin, driftwood and shells are made in a similar way with the help of chalk, the sea glass is made from a liquid form of polymer clay and the sand dollar is caned or made with a method called milifiori which is based on a technique that was originally used in glassworking for making complex designs.
So what is a cane? It’s a log or cylinder of clay that has a design running through it, so each slice of the cane - the cross-section - contains the design. I made a cane that measured approximately 2 inches in diameter and the larger the design, the easier the cane is to handle. It can then be reduced in size by pressing, stretching and rolling it so the cane becomes longer and thinner and the design becomes smaller along with it. Then when cutting slices from the cane, the design will look the same front and back.
I have tutorials on all, except for this and the driftwood. They can be found Here. Just look for the Download Category with Tutorials. If you want some sand dollars or other things, I have them too!
I know a couple of my pieces are missing from this photo, namely a sea star or starfish and a whole sea urchin, but I wanted to see how a group shot of my handmade bits would look like. Sea urchin piece, sea glass, driftwood, pebbles, shells and my most recent addition, sand dollar.
The Sea urchin, driftwood and shells are made in a similar way with the help of chalk, the sea glass is made from a liquid form of polymer clay and the sand dollar is caned or made with a method called milifiori which is based on a technique that was originally used in glassworking for making complex designs.

So what is a cane? It’s a log or cylinder of clay that has a design running through it, so each slice of the cane - the cross-section - contains the design. I made a cane that measured approximately 2 inches in diameter and the larger the design, the easier the cane is to handle. It can then be reduced in size by pressing, stretching and rolling it so the cane becomes longer and thinner and the design becomes smaller along with it. Then when cutting slices from the cane, the design will look the same front and back.

I have tutorials on all, except for this and the driftwood. They can be found Here. Just look for the Download Category with Tutorials. If you want some sand dollars or other things, I have them too!
Mar 22, 2017
Silkscreen + Chalk + Ink + Liquid Polyclay = Faux Ceramic
I was just going through my photos on my computer and while I had posted this tutorial on Facebook, I completely forgot to post it here. It’s not my usual style for a tutorial, but made it as short as possible. If you aren’t into making Christmas or Easter Ornaments, this technique can be used for plenty of other projects including Sun Catchers, Pendants, Bracelets, Boxes etc.
I’ve been making silkscreens for more than 10 years now and they have become very popular for use in polymer clay. Here is one of the earliest techniques I developed using chalk.
Silkscreen + Chalk + Ink + Liquid Polyclay = Faux Ceramic. Enjoy!
For my Silkscreens, check out the nice variety in my Etsy


Nov 2, 2016
Beaders Supplies in Faux Stone, Raku, Batik and other techniques
As you might know I create silkscreens and molds for polymer clay artists, but lately I've also enjoyed making and selling my handmade supplies.
I'm on a bit on a jewelry-making hiatus. Having pinched nerves in my neck don't make for comfort when long hours hunched over beadwork are involved, but I still need to make a living. I'm glad others are enjoying my components and that these do just as well as my jewelry. I have the components available on my Facebook Page Beadcombersupplies. The album with current items is found here:
 |
Aug 4, 2016
Silkscreened Polymer Clay Feathers...a Video Tutorial
Here is a Video Tutorial I made and forgot to post here.
Silkscreens, Pan Pastels and Chalks
When I began to make silkscreens for polymer clay about 10 years ago I never dreamed they would become so popular. The late Gwen Gibson, a Pioneer in the World of Polymer Clay, innovated the use of silkscreens and etching plates with Polymer Clay. Gwen was generous and I was fortunate to chat with her on a couple of occasions. Although I also use acrylic paint, which is the medium Gwen had primarily used with silkscreens, my passion has always been Mica. I then added Chalk and Pan Pastel. I began using Metal Pulvers in 1989 and then moved to the less toxic Mica. Back in 1989 no one told you about wearing a mask when using the pulvers or fine metal shavings and when Jacquard introduced Mica powder for Card making, scrap-booking etc (which we also use in make-up and eyeshadow) this wasn’t necessary. If you use a brush and really go at it, you might want to wear a mask, though. I primarily use my fingers to apply.
For many years I sold this tutorial, but have decided to share some of my older tutorials as I develop newer ones. Enjoy!
“Low Relief Stone Rubbings”
by Tina Holden (2008)
This is an older tutorial, but still valid. I just reformatted the layout of the text. Here I will teach you how to create 'low relief stone rubbings' on Polymer Clay. These stone rubbings are based on grave stone rubbings, but aren't as morbid. Instead you'll discover various ways and possibilities with this technique using silkscreens or stencils.

Tools:
● Tissue blades, rigid and flex (flex is optional)
● Pasta Machine (Atlas 150 used in examples)
● Needle tool or knitting needle
● Silkscreens or stencils
● round, oval or square cutters (optional)
● Flat soft bristle paintbrush
● Oven
● Baking tile or glass
● White unlined paper or card stock to bake on
● Thin Foam texture sheet or other suitable texture such as silken fabric or tulle
● Armorall as release agent
● Baby wipes or Windex for clean-up
● gloves (optional)
Materials:
● Premo! Polymer Clay: 1 small block each of white, translucent or frost, pearl and either Turquoise
Blue or Sea green (note: Sea Green is no longer available)
● Fimo Gloss or Fimo Water based Varnish
● Decorator Chalks (or pastel powder eye make-up in cobalt blue, bright green and yellow) or Pan Pastels in similar colours
● Jacquard PearlEx Mica Powder in Turquoise (optional)
● Embossing powder in green, blue or verdigris
The clay I prefer is Premo but you can use any of the other brands if you prefer, although for jewelry I don't recommend Sculpey III as it is too brittle for thinner pieces. (note…this is the older Premo packaging)
 Preparing the Clay base:
Step 1. Mix ½ block each of white, translucent, and pearl with ¼ block of turquoise or sea-green. Roll through Pasta machine on thickest setting (#1 on Atlas)
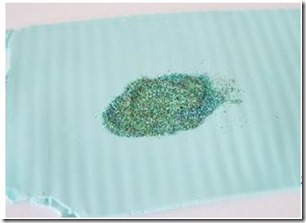
Step 3.Blend clay with ¼ tsp. of Turquoise Mica Powder (optional). Roll through pasta machine on thickest setting (#1 on Atlas).

Step 4. Cut sheet in half and lay one half aside. Prepare Silkscreen by using a little Armorall on finger and spread over the 'rubbery' side of the screen. This will prevent the fine mesh from clogging up with clay. Roll out on smaller setting, next size down, #2 on Atlas.

Step 5. Stack Silkscreen – shiny side down onto prepared clay sheet, with foam texture or tulle at backside of clay. Roll through pasta machine on thickest setting (#1 on Atlas).
 Step 6. Peel off Silkscreen and texture. You should get a low relief or stamp-like texture on your clay. (I’ve darkened the first photo so you might be able to see the texture a little better)
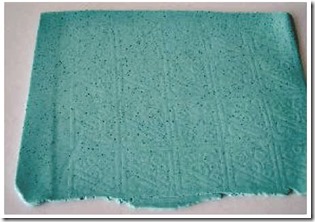
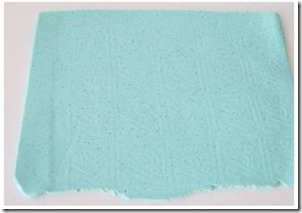 Colouring the relief texture:
Step 7. Lightly cover finger or gloved finger with chalk and gently stroke or rub
Colour onto your textured sheet. Don't apply too much pressure as you will want to keep your texture intact. Start with one colour and apply in various places on the relief. I used green chalk here.
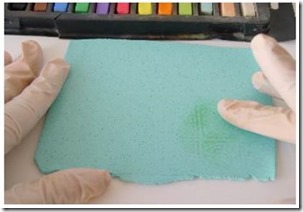
Step 8. Then apply another colour/s. Second colour I used is blue, third I used yellow. Cover entire sheet until you are pleased with the effect. You may have to go over the surface with more powder to darken it. It doesn't really matter if you apply some green over the blue, it'll actually turn it into a nice teal.

Step 9: Take sheet that you laid aside earlier and roll out at #2 setting and then texture one side with foam texture or tulle. Remove foam or tulle and carefully lay your coloured relief rubbing sheet onto the sheet you textured (texture side down), avoiding trapping air bubbles.
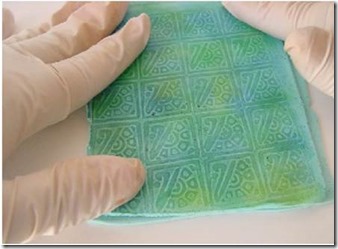
Step 10: Trim away rough edges. Any of the coloured scraps put aside to roll into matching beads later if you want to.
 Step 11: Cut into tiles for Bracelet, Earrings, put holes where you need them. Other creative uses would be for coasters or tiles.
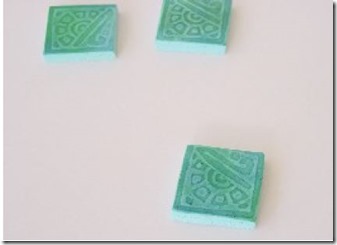
Step 12: When putting in holes horizontally, Hold the tile as shown and maneuver a thin needle or needle tool through the tile, just until it peeks through the other side. Complete the hole by pushing tool through from opposite end. For a bracelet you'll need about 5 to 7 tiles, it depends on what size beads you use as spacers, on wrist size as well as the tile size. I do have a tile bead tutorial on both my website and Etsy (links below)
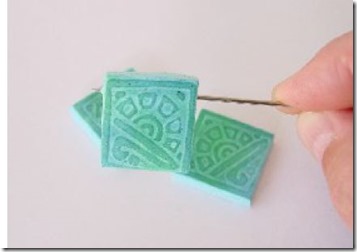
Step 13: Rub some chalk or pastel on the sides and back of the bead tiles also.
 Step 14: Bake, Let cool and varnish, then string with elastic. Tie knots and hide knots inside large-hole glass beads.

Note: you can roll your unbaked/uncured stone rubbing through smaller settings to lightly stretch the design which I did with the earrings here.

For variation try other colour combos and other patterns.
Variation: mix a different colour clay base such as ½ ecru, ¼ translucent, ¼ pearl, ¼ raw sienna and use chalks in brown and orange. Always use a light colour clay base to bring out the colours of the chalk.
Have Fun creating!!
Tina
For a variety of silkscreens, molds, tutorials etc…
My Etsy: https://beadcomber.etsy.com
For many years I sold this tutorial, but have decided to share some of my older tutorials as I develop newer ones. Enjoy!
“Low Relief Stone Rubbings”
by Tina Holden (2008)
This is an older tutorial, but still valid. I just reformatted the layout of the text. Here I will teach you how to create 'low relief stone rubbings' on Polymer Clay. These stone rubbings are based on grave stone rubbings, but aren't as morbid. Instead you'll discover various ways and possibilities with this technique using silkscreens or stencils.

Tools:
● Tissue blades, rigid and flex (flex is optional)
● Pasta Machine (Atlas 150 used in examples)
● Needle tool or knitting needle
● Silkscreens or stencils
● round, oval or square cutters (optional)
● Flat soft bristle paintbrush
● Oven
● Baking tile or glass
● White unlined paper or card stock to bake on
● Thin Foam texture sheet or other suitable texture such as silken fabric or tulle
● Armorall as release agent
● Baby wipes or Windex for clean-up
● gloves (optional)
Materials:
● Premo! Polymer Clay: 1 small block each of white, translucent or frost, pearl and either Turquoise
Blue or Sea green (note: Sea Green is no longer available)
● Fimo Gloss or Fimo Water based Varnish
● Decorator Chalks (or pastel powder eye make-up in cobalt blue, bright green and yellow) or Pan Pastels in similar colours
● Jacquard PearlEx Mica Powder in Turquoise (optional)
● Embossing powder in green, blue or verdigris
The clay I prefer is Premo but you can use any of the other brands if you prefer, although for jewelry I don't recommend Sculpey III as it is too brittle for thinner pieces. (note…this is the older Premo packaging)

Step 1. Mix ½ block each of white, translucent, and pearl with ¼ block of turquoise or sea-green. Roll through Pasta machine on thickest setting (#1 on Atlas)
.
Step 2. Blend clay with 1 tsp. of embossing powder. 

Step 3.Blend clay with ¼ tsp. of Turquoise Mica Powder (optional). Roll through pasta machine on thickest setting (#1 on Atlas).

Step 4. Cut sheet in half and lay one half aside. Prepare Silkscreen by using a little Armorall on finger and spread over the 'rubbery' side of the screen. This will prevent the fine mesh from clogging up with clay. Roll out on smaller setting, next size down, #2 on Atlas.

Step 5. Stack Silkscreen – shiny side down onto prepared clay sheet, with foam texture or tulle at backside of clay. Roll through pasta machine on thickest setting (#1 on Atlas).


Step 7. Lightly cover finger or gloved finger with chalk and gently stroke or rub
Colour onto your textured sheet. Don't apply too much pressure as you will want to keep your texture intact. Start with one colour and apply in various places on the relief. I used green chalk here.

Step 8. Then apply another colour/s. Second colour I used is blue, third I used yellow. Cover entire sheet until you are pleased with the effect. You may have to go over the surface with more powder to darken it. It doesn't really matter if you apply some green over the blue, it'll actually turn it into a nice teal.

Step 9: Take sheet that you laid aside earlier and roll out at #2 setting and then texture one side with foam texture or tulle. Remove foam or tulle and carefully lay your coloured relief rubbing sheet onto the sheet you textured (texture side down), avoiding trapping air bubbles.

Step 10: Trim away rough edges. Any of the coloured scraps put aside to roll into matching beads later if you want to.


Step 12: When putting in holes horizontally, Hold the tile as shown and maneuver a thin needle or needle tool through the tile, just until it peeks through the other side. Complete the hole by pushing tool through from opposite end. For a bracelet you'll need about 5 to 7 tiles, it depends on what size beads you use as spacers, on wrist size as well as the tile size. I do have a tile bead tutorial on both my website and Etsy (links below)

Step 13: Rub some chalk or pastel on the sides and back of the bead tiles also.


Note: you can roll your unbaked/uncured stone rubbing through smaller settings to lightly stretch the design which I did with the earrings here.

For variation try other colour combos and other patterns.
Variation: mix a different colour clay base such as ½ ecru, ¼ translucent, ¼ pearl, ¼ raw sienna and use chalks in brown and orange. Always use a light colour clay base to bring out the colours of the chalk.
Have Fun creating!!
Tina
For a variety of silkscreens, molds, tutorials etc…
My Etsy: https://beadcomber.etsy.com
Jul 5, 2016
Glad there won't be a Strike
Unions. I’ve had to deal with them when I injured myself on the job years ago and no, they did not have my best interest at heart. And while I suffer the consequence of those injuries for the rest of my life because I was not provided with the tools to prevent the injury in the first place, the only positive outcome was it put me on the road to becoming an Artist. I work with wire, bead embroider, polymer clay, resin, concrete, I write, innovate techniques…


While Canada Post has been trying to negotiate with 4 of the Postal Worker Unions on various deals. I had no idea that there were FOUR Unions for postal workers until a Postal Worker told me about it. Four Unions…crazy huh? Glad there won't be a loomng strike and that the Union and Canada Post agreed to keep talking...

Besides working on silkscreens am also creating a few Little Faerie/Gnome Doors. Perfect for a Garden. Maybe the Galleries would like some of these…


Hope to be mailing you soon…


While Canada Post has been trying to negotiate with 4 of the Postal Worker Unions on various deals. I had no idea that there were FOUR Unions for postal workers until a Postal Worker told me about it. Four Unions…crazy huh? Glad there won't be a loomng strike and that the Union and Canada Post agreed to keep talking...

Besides working on silkscreens am also creating a few Little Faerie/Gnome Doors. Perfect for a Garden. Maybe the Galleries would like some of these…


Hope to be mailing you soon…
May 17, 2016
Sand Dollar Pendants and Wire Kumihimo
I’m getting ready for the annual Blitz season of Shows, supplying shops and Galleries which has begun a month earlier than previous years. I make my usual products of Beaded Dragonflies, Sea Glass Jewelry, Enamel painted metal pendants, Polymer pendants which include Sand Dollars which do enormously well living near the Ocean. Also Sea Urchin beads and Starfish or Sea Stars as my husband insists on calling them and he would be correct as they are not a type of fish, but most people tend to call them Starfish.


I’ve created a myriad of things including my Euro style Beads with our townname on them, but still need to make Beach pebbles bracelets, assemble my handmade pendants into earrings, crochet a few sea glass bracelets and then tag and price them. Time flies!!
Here is my most recent set…my first attempt at Wire Kumihimo. I think it turned out well although for the necklace inserting the beads was a bit of a challenge as the wire cage wanted to pull in on itself. Now everything is strong and stable.

Should I do another set? Perhaps a necklace for this bracelet and earrings?

And I still need to assemble these…

So much to do…and loving it!!
May 16, 2016
Open Live Writer and Blogger
Everyone likes convenience, right? One of the reasons Istopped blogging for a while was because I couldn’t log into my Blogger via Windows Live Writer. I liked the convenience of being able to post with Word and use different Font, add frames for my photos etc. Going directly to ones blogspot doesn’t allow for those extra features. When trying to log in I kept getting errors “Password not found” even though I used the correct password. So I kind of gave up…until I read…
…that Googles 2 step verification process might have something to do with it, but despite trying everything I could find on the subject except for being able to add a mobile phone number (I don’t have one!) Windows Live Writer still wouldn’t budge. Then I discovered Open Live Writer. It’s very much like Word for your blog and looks very much like the Windows Live Writer. One can’t tell the 2 apart, really. Yay!!
Now I don’t have an excuse not to blog  . Here is the link for the Program. http://openlivewriter.org/
Mar 31, 2016
Have you made your 10 x 10 for the Fimo World Project yet?
Covering the World...in 10 x 10 squares.
Here is the Facebook Group link https://www.facebook.com/groups/1810793605813598/
There is still time to make your project. Here is what I submitted. And yes I used Fimo. I switched back to Fimo (Professional) after a long absenteeism. Why did I switch back? Because I got tired of the inconsistencies with other polymer clay.
True, some say Fimo is a bit harder to condition, but if you have spent enough time with polymer clay, you'll soon appreciate why after a bit of handling, the rolling snakes to a fine tip without a hitch makes it THE reliable clay. I don't mind whacking it a bit with my acrylic roller before putting it through the pasta machine, I actually enjoy it! lol
So here is my 10 x 10 titled 'Nautilus'. It's an 'Aquarium style' with free floating beads. I used Black Fimo Professional, my crackle technique (tutorials are on my website http://beadcomber.com). I even used some Fimo Metal Pulvers I still have in my stash. The metal vs. mica is obvious.

While I was at it, I also created one of my Aquarium Pendants...Want to see a tutorial? or two? I'm almost finished with an Aquarium pendant tutorial and then I'll share "Secrets of the Nautilus"....

Subscribe to:
Posts (Atom)

