Aug 31, 2009

Polymer clay UV gel lamp and cabochons

It is summer, but unfortunately this season we've experienced a fairly cool and wet summer due to El Nino which means very little sun. This means I can't cure my Magic Glos unless I have a lamp. I've found an economical one online, for $25 including shipping, sent from the UK, Sisi-business on Ebay. Am quite happy with it. What I like about it is that it has an off/on button and no timer. Most other ones I looked at on Ebay have either a 2 or 3 minute timer with automatic shut-off which means you'd have to reset it a few times. If you decide to order one, make sure you get the North American plug-in.
While on the topic of curing UV gel, I've found that when applying Lisa Pavelka Magic Glos on Polymer Clay pieces that the gel would always recede or pull away from the edges. I'd then have to apply 2 or 3 more coats or layers to fix and even then I might miss part of the edge. This would use more Gel than I'd like. Frugal me, the gel is fairly costly at approx. $9 an ounce. Apparently it is now available in 6 oz bottles too which will serve me better since I like to use it a lot, lol.
I've finally found a solution to avoid the 'pulling away'. It's so simple I wish I had discovered it sooner! By applying the Gel first around the rim of the piece and curing it, the gel won't recede.


Then I apply the second layer, filling the center of the cabochon and around the edges again, giving the piece a 'domed' appearance. Cure a second time. Afterward a little sanding around the edges will fix any rough edges. I'll show you tomorrow what I do with these pieces...

Aug 26, 2009

Beading amongst Chaos

It is time for some beading and assembly.
I have various things on the go and its hard to decide from day to day what needs to be done next. I wish I had done a few more polymer clay focal pendants before starting on assembling.

Right now I'm working with my recycled glass beads and my stuff is everywhere. I don't know about you, but for me it is impossible to create unless I have a lot of things available to me visually and I mean a LOT. I have drawers full of supplies, but what good is it when they aren't right there to say...oh yes, that colour would go nicely with this bead.
When I need to clay again, all of this has to be cleaned up.

So this is what is on my desk right now...My teeny work surface, but its enough for assembling one thing at a time...

And this is what is on one of my little side tables (I have two others)...wire, cord, beads, ultrasuede bits...

This is what I finished today...some necklaces

some lariats...

Closeup of a recycled glass bead...I got these from Africa...

Close up of one of my polymer clay sea urchin cabs...

Aug 6, 2009

Imitative Beach Pebble Tutorial - Part 1


I'm pleased to announce that I can finally offer you a tutorial for imitative beach pebbles. With only a few colours and tools you'll be able to create a range of beach pebbles that'll fool the naked eye. The only deception is their light weight. Inspired by real beach pebbles, in this lesson you'll recreate veins, textures and ocean tumbled forms. Create stones of any size or shape, and then drill them with ease. Part 1 will show you how to create 4 types of basalt rocks, 2 with 2 techniques of achieving quartz veins (one slightly cracked, one banded). One black basalt rock with different shading, cracks/marks that enhances realism and one with a quartz inclusion. Lastly some red Jasper with inclusions and some tips and tricks to make your pebbles stand out.
Pasta machines for this project are entirely optional.

This tutorial is packed with 63 photographs, 22 pages, and 55 steps of instructions. Available on Artfire.

Part 2 and 3 coming soon...

Which one or ones are the fakes??

Jul 31, 2009

Pebbles and almost every stone

I've made a few Pebls again. Should you wonder what Pebls are, they are Polymerclay evolved beach-like stones. I came up with the name for a swap I hosted in 2007 for Clayamies. You can have a look at the pebble bracelets here.

What have I been up to since last posting (besides family visiting, beading, claying...). I made a few Pebls for earrings and necklaces. Incorporated a few in my Picasso pendants, black wire frames that I hammer into shapes and then wire up with gemstones. These have become quite popular sellers for me at various galleries and shops. One customer couldn't resist and had to purchase two! When I created custom earrings for her and went to meet at a local gallery, she couldn't decide and took a few pairs as well. She insisted I get them into the bigger cities and she's going to show off hers. lol...I love customers that are enthusiastic about my creations.

Here are 3 styles of pebls, gray rocks with 'quartz' veins, red 'jasper' and "garnet schist'

Add a black "Basalt"...

Almost every Gem I could muster, Lemon quartz, topaz, amethyst, rainbow flourite, turquoise....I think I'll call this pendant...

"Almost every stone"

I finally started a video for the Pebls, but will continue with it this coming week.
I've had a few requests on how I create my banded rocks with the quartz inclusion. Videos aren't easy to shoot, especially when I'm my own artist, director and camera person. You may catch me with my finger on the 'remote', lol. I can see that editing is already a daunting task since I'm so 'picky'! I'll give it a shot, pardon the pun, but may also turn the tutorial into a photographic one, like I'm used to doing. The plus with video is that I can show some of the trickier aspects without producing a flip photo-style book. I'll be aiming for 5 or 6 styles of Pebls.

Jul 8, 2009

Layered Polymer Clay Discs

Oh my, how time flies. Wednesday already! Had a friend visiting for a couple of days that we tried to cram with as much Polymer Clay as possible. There was a lot of 'lets try this! or that!' but we didn't get as much done as we'd hoped for. Some of it was work...namely 'sanding', but we took some breaks with beach and forest walks to clear our heads or give our shoulders and hands a rest. Beach and sand and sanded fingertips...mm...The weather wasn't too great, a bit drizzly and wet, but this is a Rainforest, what can I say, misty facials, lol.

Our heads are crammed full with ideas! It was inspiring to chat in person about various techniques. While Vanessa has left for home, my work isn't done. I still need to finish the box that I started and create a few more molds and stencils. Some of the stencils I made didn't work out...photoEZ has a limited shelf life when undeveloped.


We actually got something done and finished! - Layered polymer clay disc necklaces similar to Bettina Welker's necklace in PolymerCafe ( Summer 2007). Instead of magnetic closures we used a beaded loop-over-button method. We chose a mokume gane technique instead of texture. While the concept of the layered disc necklace is appealing to me, the flipping and layering of the beads at random when the necklace is picked up and laid back down again, is not. It would be a problem when trying to sell such a necklace in person, it would require constant fussing with the beads to stack up properly again. I thought that adding size 6 czech seedbeeds between the disc beads would help prevent the problem, it didn't, but it gives the back of the necklace a tidier finish and also lengthened it a bit, necessary for my larger size. I think this necklace will be a 'keeper', that is, I will wear it. I'm going to play a bit more with the concept and am sure I can come up with a way to keep the beads stacked.

The dark blue necklace is Vanessa's, the azure blue is mine. Aren't they lovely?

Jul 1, 2009

Polymer Clay Tutorial on Sea Urchins published

The much anticipated tutorial is now published on Artfire. If you've wanted to create your own sea urchins from polymer clay, I now have step by step instructions published.
First I will show you how to create a mold from a real sea urchin (ready made molds are also available for purchase).
Then you will go on to learn how to create a hollow polymer clay sea urchin and finally you will learn the effect of color for added realism.

This ebook is packed with 35 steps, 43 photographs, and 16 pages.

As I said, ready made molds are also available so that you can...

Jun 29, 2009

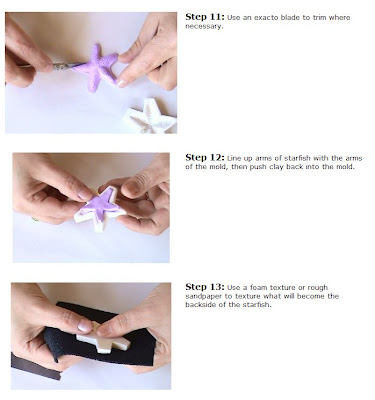
Starfish polymer clay tutorial

Here is a simple tutorial on how to make polymer clay starfish. You can use my mold that I have for sale on Artfire, or you can use part of the tutorial and create your own texture. (click on pictures to make larger). Instead of pressing a sheet of clay into a mold, I'll show you how to use your fingers to make starfish 'arms'.....


Jun 19, 2009

Polymer Clay Molds and Cabochons

I finally made some Polymer Clay Sea Urchin Molds and Cabochons for sale.

I've been asked at various times for a tutorial on Sea Urchin related things, but I've also been told that it isn't always easy to find sea urchins to make your own molds from, so decided to offer up a few.
I will still write a tutorial for the "whole" ones, but it will take me a while since I'm so busy these days.

Still, it is almost summer and you may wish to use these textures as soon as possible for your own projects.

With sea urchins in mind, I'm also offering sea urchin cabochons in various shapes and colors for the beader and beadwork or the polymer clay crafter to incorporate these into their own polymer clay projects to be rebaked.

You can find these in my Artfire or click on the Artfire on my right sidebar.

Jun 8, 2009

Polymer Clay Petroglyphs

My latest Polymer Clay articles are receiving a sunny disposition with more orange and lemon flavor. I created a few more stencils and made some petroglyph PhotoEZ stencils for business card cases as well as for necklaces and earrings.

Jun 1, 2009

Purple Polymer Clay Jewelry

Am in a mood for purple. These earrings and necklace are made from black Polymer Clay with Jones Tones foil and resin. I used some of the fishing lure spoons for the oval earrings and some other metal backs for the others.
I have put 3 sizes of the fishing lure bezels up on my Artfire.
I made these with the large size...
These are made with some other bezels I have. I may put a few of those up tomorrow.


This purple starfish is my favorite. Already sold 2 of these. These pictures don't do it justice because it has 3 dimensional depth that can't be shown with a 1 dimensional photo.

Related Posts Plugin for WordPress, Blogger...