Jul 1, 2010
Bracelets again
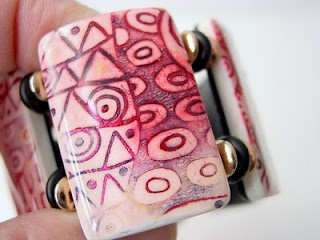
Haven't gotten to post in a while and just a quick breath up...to post a few quick pics of more of my Batik and Shimmer bracelets before diving back into work...

Jun 10, 2010
Teeny Polymer Clay Sea Urchin Molds and Beads
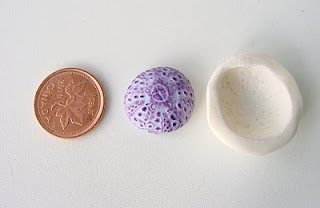
I've been spending some time this week creating smaller sizes of sea urchin beads from polymer clay. I'm also offering the molds as well so that anyone can craft realistic pieces for their summer or other craft.
For the sea urchins the sizes measure from a scant 18mm (shown) to 35mm. Sizes are approximate since one can slightly distort the beads smaller or larger from the mold. The small one here is a little smaller than a penny.(CDN and US pennies are the same size)
Different starfish molds are also available. Sizes are 30mm to 65mm. I've listed these in my ArtFire.
Labels:
molds,
sea urchins,
Starfish
Jun 9, 2010
Baubles and Polymer Clay - revisiting past times
I was digging through my photo archives I found these cats pins from 2000. They were probably the most 'cutesy' thing I've done, lol.
Or how about some Lizards, Fish, Starfish from 2001. The top two have images behind the bauble, the bottom two have texture.
Some of these turtles have images, drawings and others have canes.
And then there are Angels, and Mythical...I used to sell those in little leather bags, but I incorporated them as vessel tops also...
These bauble pendants gave rise to my 'Aquarium pendants', photographic images behind glass and movable objects between the glass and photo, to give the piece 'movement'. Of course they weren't made with glass baubles as I needed something a bit larger. I had tried the larger glass baubles, but they often have flaws and the backs of them aren't perfectly smooth.
I should re-visit the good olde days more often, lol.
May 30, 2010
Feature Smoosher - Coltpixy
Each week I'd like to introduce you to a fellow ArtFire Smoosher. This week the Spotlight is on Angelina Star Edwards aka Coltpixy. Known as Star in our Guild, Star is also our Guild Master of the Polymer Clay Smooshers. Star has done an amazing job promoting us.
I love what she does with faux techniques, especially hearts that are made using her own special technique. These ones are found in her ArtFire Studio.


The other faux techniques that are inspiring are her fabulous turquoise cabochons. Who'd know they aren't real! You can find these in her ArtFire Studio also.

...or her Faux Jade Bamboo Pendant

Or some of her exceptional ghost images of mica shift...

Browse Coltpixy's blog or have a look in her Flickr Album where she has some fabulous MOSAICS ...

I love what she does with faux techniques, especially hearts that are made using her own special technique. These ones are found in her ArtFire Studio.
The other faux techniques that are inspiring are her fabulous turquoise cabochons. Who'd know they aren't real! You can find these in her ArtFire Studio also.
...or her Faux Jade Bamboo Pendant
Or some of her exceptional ghost images of mica shift...
Browse Coltpixy's blog or have a look in her Flickr Album where she has some fabulous MOSAICS ...
May 16, 2010
Polymer Clay and various UV Resins
(little update below) Resin is now an integral part in my Polymer Clay jewelry making. It provides a smooth surface treatment, adds depth, acts as a protective coating and intensifies colours.
As mentioned in previous blog posts, I've tried various types of 2 component resins. Mixing correct ratios, where small quantities are concerned, is extremely difficult unless done with a 2 part syringe that has one common plunger.
The UV cure resins that are cured with sunlight or UV lamps are much simpler to use. There are a few resins, as well as lamps, on the market now, some of which are easily obtained.
For the crafter where affordability is the decision maker, here are the cost break downs. The costs are from the manufacturers or distributor sites. (Pricing is approximate at time of writing)
As with many products, the larger the quantity the 'more bang for your buck' as the saying goes, or for those that don't understand what I'm talking about, the greater the volume you purchase, the cheaper it is.
- Magic-Glos by Lisa Pavelka (1 oz. average $9.50, 6 oz. average $50 or $8.33/oz)
- Ultradome (1 oz. $6.00, 8 oz. $30.95, $16 oz $51.00 or 3.19/oz)
- Gel du Soleil (9ml or 5/16 oz for average $8 and 120ml/4 oz bottles for $67.00 or $16.75/oz)
- Deco-coat 60-7155 also known as Illumabond (edited...PLEASE NOTE: This company no longer sends sample requests to individual crafters and will supply larger manufacturers only. Minimum order is 1 quart)
For the comparison shopper where cost is of importance then Ultradome would probably be the your choice, whether purchasing smaller or larger quantities.
I haven't tried Gel du Soleil, mainly because of the somewhat prohibitive cost, but my friend Gera Scott Chandler has tried and written about it in her comparison on UV resins.
I haven't tried Gel du Soleil, mainly because of the somewhat prohibitive cost, but my friend Gera Scott Chandler has tried and written about it in her comparison on UV resins.
One thing to remember is that each of these resins have slightly different viscosities, properties and cure times.
What I like about:
Magic-Glos:
Magic-Glos:
- Created for the polymer clay crafter.
- The small bottle is easy to grip, has a great small stubby nozzle that pretty much prevents bubbles. When squeezing a bottle with a longer tip and then releasing, the air that enters the bottle will likely introduce bubbles into your resin on the next squeeze. The stubby nozzle doesn't give those bubbles much opportunity and if you should get some, doing a quick sweep with a heat gun pops them almost instantly. Although a butane torch is the recommended tool, I haven't encountered problems with my heat gun.
- Of all 3 resins, in regards to viscosity or thickness...Goldilocks would say this one is just right.
- Domes beautifully. My technique and to 'prevent pulling away from itself on the edges' is to give the object a rim with the resin first, cure, then apply more resin on rim and center and then cure again.
- The availability of larger quantities has brought cost down. The con about it is it doesn't have the short stubby nozzle, but I solve this by simply refilling my smaller bottle.
- Cures fast in sunlight or under a UV nail lamp.
- Easily available at major craft/hobby and online stores.
- Can be applied on slightly curved objects and rounded edges without running over the edge...see bracelet tiles above. I sanded the edges of the tiles.
- Con...not really a con as it has a solution: if your object has a bezel and you apply magic-glos, the resin looks slightly uneven and kind of lumpy next to the bezel. Easily solved...You can apply magic-glos, cure and then make a bezel around your pendant and bake again.
- Cures as quickly as Magic-glos, about 20 to 30 minutes under a 36W UV lamp, less when in direct sunlight. I'm not sure why, but perhaps temperature is a factor in cure-time. Warmer, it seems to cure faster.
- Excellent for encapsulating with bezels...cleaner or smoother edges than Magic-glos. No pulling away from edge...but can run over.
- Available in 1 oz trial size, and now also with a nozzle, although it's a longer nozzle makes application so much easier.
- Bubbles pop on their own when letting the item sit a bit in the dark before curing, or they rise to surface that they can easily be popped. A lighter works well too. Again go to Cindy's site to read more about it.
- After curing can be baked with more polymer clay added.
- All around a good resin and very cost-effective.
- Said to store up to 1 year in dark, cool place.
- Shipment via USPS to Canada.
- Con: Best suitable for flat sharp edged items, i.e. cannot be used on curved bracelet tiles. When using cutters, clay domes slightly and this resin tends to run over the edge on slightly rounded edges (read Cindy Lietz's blog and comment section which has a graphic about what I'm talking about). Goldilocks says this one is kind of thin.
- Good doming product. Works on slightly curved objects and rounded edges as for bracelet tiles. Similar to Magic- Glos, but no need to do a rim first. No pulling away from itself.
- Fairly reasonable in large quantities, but how much resin can you use within 6 months.
- Cures fast in direct sunlight and about same time as the other resins, about 20 to 30 minutes under lamp.
- Can be baked after curing.
- Con: Need to provide your own applicators. Ships only via USP. Available in large quantities only. By the time I received this product...be prepared to pay double its cost for shipping, custom and duty.
Have fun playing with resin! I know I will...I'm going to rebake a couple of pieces, one with Deco-coat and another with Ultradome...will let you know what happens.
Verdict is in...they are...BAKE-ABLE!! yay!
Verdict is in...they are...BAKE-ABLE!! yay!
May 11, 2010
Polymer Clay Batik Hearts
I had a bit of the purple polymer clay batik sheet left over, so made some matching heart earrings for the necklace I had posted on Facebook
I felt like hearts today...
Here is another view of it, with a penny for size...
Heart Earrings to match...
Or even round studs or clip ons...
I tried to photograph the hearts above at an angle so one can get an idea of the layer of resin. The hearts are about 1 inch tall. I always make the pendants with my signature flower bails. Some flower bails are larger, either with a larger flower or with a black lava bead added. I sand and buff all my pendants, but the teeny 1/2 inch beads are a bit hard to hold, so they only get a quick little sanding to take the sharp edges off.
The necklace heart pendant measures 1 5/8 inch tall, not very big, but I figured some like smaller heart pendants also, so I came up with these...
And even teenier earrings too...these ones measure 1/2 inch tall and with the onyx and hook 1 1/2".
May 6, 2010
Polymer Clay Poetry - Jewelry sets
Butterflies in brown,
Hummingbirds of green,
add a pretty gown,
and let yourself be seen...
...in this.
I strung this one late last night. 5 graduated pendants with butterflies, humming birds and other textures. Strung with semi-precious tiger eye and glass beads.
Some close ups...
and some matching earrings...
When I put this up for sale I find it hard to sell these 'sets' as separate items. Not everyone wears earrings (like me) and not everyone wears necklaces, so offering separate pieces is a must, however, with some things it feels like I'm breaking a butterfly in half...and most often the earrings go first. I didn't have enough of the pattern to make another set of earrings, so will make some with the glass beads and tiger eye as an alternative...the complete set will be cheaper tho than the separates...
Apr 29, 2010
New Polymer Clay Tutorial - Steampunk Gears, cogs, washers and a Pendant
I finished my latest tutorial. The title is a bit lengthy, but since the tutorial includes gears, cogs, washers and a pendant...I suppose I could have left it at gears and gone with just the photo. Oh well, it's details.
If you want to fashion some 'steampunk' jewelry but don't have watch parts or immediate access to them, this tutorial would be ideal because you need few materials and tools to get started. You don't even need a pasta machine. Don't worry if you don't have all of the driver bits either, but every household should have at least a few on hand. If anything, at least a Slotted, Square Drive, Phillips or Robertson. If those names are like a foreign language to you, the tutorial includes a chart with names and photos. Google comes in handy when looking up images for Screwdriver bits and I learned a bit ('scuse the pun).
This tutorial shows you how to make your own gears, cogs, and washers. You'll make molds using the common screw driver bits, and all you need are a few other simple tools to complete molds, gears and a pendant.
Geared for easy to intermediate (pun not intended) Even an advanced clayer may get some enjoyment and perhaps even a few tips out of it.
46 steps, 55 photographs, 19 pages
Available on ArtFire
Apr 19, 2010
Batik Amethyst Bracelet and Earrings
I promised to retake a photo of my complete Polymer Clay Batik necklace yesterday and completed the bracelet and some of the earrings. The earrings are round studs and clip style, but have still to finish the rectangular earrings. The various sets I'm creating are mix and match. Still to also finish up are the amethyst crochet bracelet, earrings and a simpler rectangle pendant on black cord. Basically the sets will suit tastes from casual to more elegant.

Apr 18, 2010
Polymer Clay Batik Necklace - Amethyst
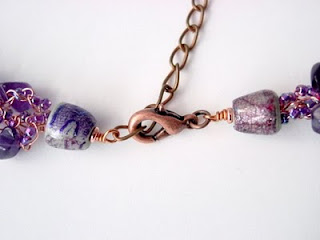
This weekend I was only able to make a few Polymer Clay Batik tiles and assemble and finish one necklace. I crocheted some copper wire and amethyst chips for which I made a focal pendant as well as 2 side beads. The clasp end connectors are also covered in the textured clay.
In my haste the picture of the whole necklace turned out too blurry, but will take another tomorrow, along with the matching bracelet and earrings. It's too dark now...

In my haste the picture of the whole necklace turned out too blurry, but will take another tomorrow, along with the matching bracelet and earrings. It's too dark now...
Subscribe to:
Posts (Atom)


