Jan 28, 2011

How to wrap a wire loop

Making jewelry and pendants from your polymer clay will often require a little wire work, so here is a mini tutorial on how to make a secure wire loop.

Step 1:  Use the tip of round-nose pliers to grasp the wire right above the bead. Form a 90° bend in the wire.

 Step 2: Grasp the wire at the bend with your round-nose pliers and pull the tail wire over the top of the pliers' jaws.Here the top jaw of the pliers is in the loop.
 Step 3: Change the position of the pliers so the bottom jaw is in the loop.


Step 4: Swing and bend the tail wire around the loop.


Step 5 : Keep the tail wire horizontal as you coil it tightly down the neck wire.


Step 6: Crasp the loop with flat nose pliers and tuck the end wire in as much as possible.

Step 7: And trim with flush or side cutters.
 Done...except now I need another one for some earrings!

Jan 21, 2011

To cure, bake, cook, fire or harden?

Depending on what terminology you prefer, we bake, cook, fire or harden polymer clay. Isn't it a bit confusing? Or do we really care as long as the project turns out! The terminology doesn't really bother me.
Even various Polymer Clay manufacturers are divided on what to call the hardening process. Premo clay says "Baking should be completed by an adult". Fimo clay says "Harden in home oven..." and Kato polyclay says "Bake in oven at..." although the front of the package says "oven hardening". I believe many Artists are just as divided on what to call the process.  I'm curious...what do you prefer to say??

About process...I just finished and listed a new tutorial, based on some recent projects. Here is one for

Bead Cord Ends with Personality - Imitative Metal


Jan 18, 2011

Now why did I delete that Program for?

For some reason I noticed this program on my computer and gave it a try, only to realize that while it was free it came with advertising. All I wanted was to be able and insert photos in a table sort of thing, but it turned itself into a slideshow which I didn't want. I inserted photos and clicked on 'save' (even though I wasn't quite finished) and was taken to a website. Then when it was published it had advertising on it and didn't like because it detracts, so deleted the program...
Just now I go into my Picasa and I see the photo collage there! ohhhhhh...but I have deleted the program and don't know where I had gotten if from, lol. tsk tsk...lesson learned...don't always be in such a rush to get rid of things! I suppose there are other ways to do collaged photos, but this was so simple!...drag and drop into space.
Here is the photo...


Jan 17, 2011

Polymer Clay Heart Pendants and Ancient Jewelry Series

This is my 22nd year with polymer clay. Seems like so long ago that I began to work with this wonderful chameleon-like material. It can mimic so many materials, stone, bone, wood, metal... with the exception of one long sought after...truly transparent glass. While we have translucent clay, it alone can't harness the shine. Sanding and buffing translucent clay is an arduous task and still doesn't compare to the silica based glass. We've added resin to this material, but are still limited to flat and level surfaces. Using thick glossy lacquers are limiting in dimensionality. There is still much left to explore and discover.
I've revisited some of my past work again...and returned to metal pulvers and mica's especially for my latest hearts some of which have an industrial steampunk look and also for the Ancient jewelry series or renaissance jewelry.


Dec 24, 2010

Merry Christmas Polymerclay People!

Tomorrow is Christmas Eve! How time flies! I've been busy filling my newest shop on ArtFire with beads, pendants and handmade supplies, but I am so slow in taking photos, resizing them, doing the listings etc.
Tina Holden Design
And tonight I was bored, so much so that my muse decided I should hold a little sale while I'm at it. I haven't had one in a very long time and wasn't going to do one, so why now? Maybe it's a Thank you! and because I need to write some new and fresh things. So, am giving everyone 20% off all my stuff like Tutorials, molds etc. until the end of the year. Not exactly creative, eh? lol oh well, told you I was bored...Click on the links to visit both my shops...
Beadcomber
Merry Christmas everyone!!


Dec 17, 2010

No piercing Ear Ornament

A while back I hinted on Earrings for those with no piercings. I've been wanting to wear dangly earrings, but can't stand clip-ons as no matter how gentle they are supposed to be on the lobes, they hurt! I've tried small clip ons, large clip ons, screw ons and even the lightest weight would tug and cause me to take them off within the hour. Then I was inspired when I watched Angelina Jolie in the movie 'Alexander the Great'. The earrings she wore weren't pierced nor clip on...but over the ear hooks, much like ornaments! Hey...presto!

My test version with one of my Batik polymer clay pendants. The hook really isn't visible when hair is worn normally. I've tucked it behind my ears so you can see how it hangs. My next version will add some fancier wire work...


Dec 8, 2010

O Christmas Tree, O Christmas Tree...

...I made you out of wire!
I could have used a small tree to display some polymer clay ornaments, but one can only see them from one side and on a limited size display table, a tree would take up quite a bit of space. I was looking for something simple and my friend sent me this link for Julie Keehners necklace display stand. Julie had used 16 ga wire. I used 14 ga rebar wire, but don't think it is much stronger. Still, for light-weight objects this is not a problem. I formed my wires in a sort of 'seaweed' fashion much like I have made for some of my ornamental boxes  and this in turn inspired me for a future idea of a display stand. Not much time this week as I'll be participating in our annual Winter celebration, so this stand will have to suffice.
Here is a close up of the candy cane

and if you want to make stars, bells or trees...I have Tutorial for Christmas Ornaments with Glass Bauble windows.
Christmas Star Ornament Tutorial

And about studio mess...there is no argument that it desperately needs tidying up. The top shelf in as much disarray and so is the rest of the room. I had a look at Vanessa's desk and it looks quite organized to me :) and looks much like my cleaned up version. I'm going to spend part of today tidying up my mess so I can create a new one, lol.


Nov 7, 2010

Felted Wool Grinch Purse with Polymer clay Handles and Buttons

I've been busy knitting and felting wool, making matching Polymer Clay purse handles and buttons for them and am also getting requests from family members, a couple of whom I now know what to give for Christmas.
I had made crochet purses before with polymer clay handles like this. I don't normally do cute, but this one had a mind of its own! lol
Green and red...reminds me of...The Grinch that stole Christmas!! except he wouldn't have a flower on it...lol...unless someone insisted on making him happy!! A little play on the words...but my purse becomes Purrs...Grinch Purrs, I think its official.

The purse handles, I make them hollow, with a tough but slightly stretchy cord with just enough give to remove from the purse for which I sewed buttons on the outside this time. I've previously stitched the buttons to the inside, but what good is it to have decorative buttons that one can't see. Plus I stitched one to the center of the felted flower.

Anyway, the handles are removable so that the purse itself can be washed if necessary. I started making various other handles and matching buttons now that maybe available in kits soon with select chosen yarns...more on that soon, but here is a view of the "Grinch Purrs" for which I used Galway 100% Peruvian Wool as well as a touch of fun yarn.
I crocheted and felted the flower for which I dyed the orange wool with Kool-aid (mmm...and it smells like mandarin oranges!), then made a matching flower cane. The bright red was a toughy, but finally came up with a nice bright blend of cadmium red and fuschia.
 Finished purse...the green looks a little washed out here....it is actually a Granny Smith Apple green...much yummier in person...but am thinking blueberry Seuss for the next, lol.


Nov 2, 2010

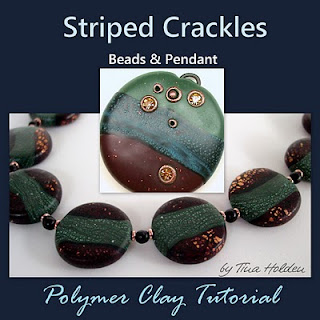
Polymer Clay E-Book - Striped Crackle Beads and Pendants - Tutorial

Shameless self-promotion, but what better way to announce that I have another polymer clay tutorial finished. So I am blogging about it here.
I tried counting the number of tutorials I have written (including a few beadwork and wire tutorials), but am having a hard time counting. I think this one will be the 33rd.
What is this latest tutorial about?
Striped Crackle Beads and Pendant. Essentially it is a 2 in 1 tutorial that is broken down into several parts. Learn in detailed guided step by step to make flat round beads with inclusions and a crackled banding and how to achieve fingerprint-less surfaces (found out that google doesn't like the word 'fr-ee' and wouldn't let me post that in my description, lol).
The bonus with this tutorial is to create a slight variation of a matching pendant that has accents and embellishment of swarovski crystal. You will also learn my method on inserting stones without the use of glue.

The tutorial has 51 photographs, 45 steps, and 17 pages. It's in my ArtFire Shop.


Oct 28, 2010

Felted Purses with Polymer clay Buttons

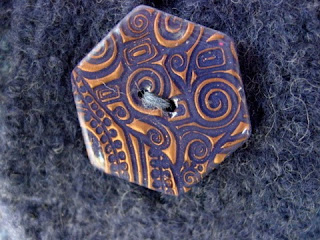
Here is a smaller felted purse, it's half the size of the one I showed in the last post. I love the hexagon shape for the polymer clay button that I covered with Resin. A friend recommended I should teach felting at the local yarn shop and how to make buttons.
I threw in one of my scrap clay heart pendants on this post. I have a few to list on my ArtFire. So many things to do, so little time...


Related Posts Plugin for WordPress, Blogger...