Jan 24, 2010

Ancient World meets Future - Myriad Polymer Clay Pendants

While working on these polymer clay somethings, including some spirals (not shown), the first thought that came to mind was Archimedes. I was looking for a name for these pendants to be and had to ponder why that word would jump out like that.

Archimedes was a Greek astronomer, inventor, engineer, physicist, and mathematician.


The watch gears hint of steampunk, and yet the pendants don't look anywhere near Victorian which is a major criteria for something to fit into the Steampunk genre. I know that a lot of people stick some gears and bolts in some clay and call it Steampunk, however, true Steampunk does not contain an iota of plastics, only metal, glass, leather or the kinds of things that were around in the Victorian Era. And frankly, polymer clay or PVC was not invented until 1933 in Germany by Semon B.F. Goodrich. Check out this interesting time-line of polymers.


So what do I call my pieces that are more inspired by 'Ancient World meets Future' along with gears, nuts and bolts, resin, inks of the now...I was trying to guess how many pendants I have created since I started claying, beading etc and a wild guess would be in the thousands. 10,000 is a Myriad in Greek...A Myriad of Polymer Clay Pendants, or just a few.
Stay tuned...I'll be blogging about a wonderful new component resin.

Jan 16, 2010

Tofino Beach Drift - Polymer Clay Pebbles and Rocks

Been hiding in my studio to work on some new polymer clay jewelry, namely my beach pebbles. Filled with new inspiration I'm giving my 2010 line a lift, by including some driftwood pieces. The recycled glass looks like beach glass which of course goes well with stones and driftwood.

Among the beach pebble jewelry are a few Inuksuits (plural of Inukshuk) which were re-requested by a local gallery. The Inukshuk also forms the basis of the logo of the Vancouver 2010 Winter Olympics. You may want to google some interesting facts about this symbol. I'm having another idea on how to incorporate this into some work.

These pieces will be among others that I'll be taking to an upcoming Wholesale Show near Victoria. Stay tuned for more Tofino Beach Drift...


Jan 4, 2010

Polymer Clay Tutorial - Celtic Gold Cookie Cutter Box

A new year, a fresh start. I've been working non stop since the 1st of the month on this Polymer Clay Tutorial. This polymer clay box has been on my mind for some time. I've been itching to do a lesson on vessels and boxes. Here it is!

In this detailed and multi technique lesson you will learn to make a box by using a cookie cutter that will act as a mold or form. The finished box resembles old leather with metal appliqué. The turquoise crackle lid and stamped embellishments add to the overall aesthetics and richness of the vessel. Don't like to sand? No problem, as this project is not recommended for the sanding enthusiast! I'll show you tricks to avoid this chore and how to accomplish invisible seams.

Don't let the look of the box intimidate you, it can be altered to a simpler version by leaving out some of the steps. If you don't have Celtic knot-work stamps, use Asian, Floral or other stamps, however, I've include an On-line Supplier list of both Canadian and US Retailers/wholesalers that ship worldwide, including where to purchase Celtic rubber stamps, Cookie cutters, Paint, Texture plates etc.

Also included with the tutorial is a printable cutting guide.

This detailed 78 step lesson has 80 clear photographs and 29 pages to guide you through 7 parts:

Crackle Technique
Cookie Cutter box form
Bottom
Stamping, Texturing and Embellishment
Molded Lid and Handle
Box Feet
Finishing

With the crackle technique alone you'll be inspired to make beads and pendants :) if not more boxes!
(Box sold separately, please inquire)
The Tutorial is available on my ArtFire.


Dec 26, 2009

Customer Appreciation Photos

I'm glad some people share what they make with other peoples polymer clay tutorials. I just noticed in my Etsy that there is a place in Feedback for Customers to leave Appreciation photos. Here are a couple, one by Freshwater Designs who sent me a photo of a necklace she made using my Toggle Tutorial. The other one is by Katherine Jewelry who used my Christmas Star Tutorial.
Good job! and thank you for sharing what you made with it. I would like to see more what people do with my tutorials. Please share more...

Dec 1, 2009

Polymer Clay Pins and Brooches

I finally finished some of the Polymer Clay Mokume Gane pieces from the Julie Picarello workshop last month. There seems to be some fog in the photo toward the back. When I looked at the lens it was all steamed up...it was cold outside. Next time I need to acclimatize the camera first, lol.
Yes, I sanded, but didn't buff them too much, just a few quick rubs on my jeans.


Nov 18, 2009

2 Days with Julie Picarello

I finally get to write about the fabulous 2 day Polymer Clay Workshop that I spent in Vancouver amongst old and new friends and the fabulous Ms. Julie Picarello. You'll probably recognize her style...

I love Julie's style, not only her wonderful mokume gane work and jewelry, but also her style of teaching. I absorbed as much as I could. I actually got into trouble with Julie when 'someone told on me'! that I'm a sanding rebel! She had to have a word with me about that and I promised sheepishly that I would sand. Well, it really didn't help that most of my usual work is of such nature that it doesn't require sanding. Pebbles, anyone? lol Ok...seriously...I don't really need any convincing that the mokume gane would benefit from some sanding. It really makes it 'finished' and of course do I want my pieces to look finished (when they get finished, haha). What I loved about this workshop, there was a lot of laughter! (we all got to wear our comfy slippers and Julie had chocolates on her table that we got to munch on!...mmm...)


Julie taught us her particular style of mokume gane with imprint and incorporating interesting bits of funky metals, drilling, sanding, copper tube bails and intriguingly patterned lizard tails...Thank you for a great weekend, Julie. (Sorry about the pic...I should have aimed a little different...no folks, Julie is not wearing a hair barrette...oops)

Julie instructing and intent listeners...

Well, those are some of my 'colors' and then I made this...

 I think it was a nice surprise. Ok, ok...not finished yet. I'll show you later, I still have to sand! lol


Julie's fabulous jewelry.


and interesting 'lizard' tails...I see a lot of potential!


Group Photo...we all fit in!!
That shot took some maneuvering on a ladder, lol. A very Big Thanks to Linda ( third up from bottom left with her hand on my shoulder). Linda was our wonderful Hostess for this Retreat. Those of us that chose to stay with Linda got comfy beds, yummy goodies for breakfast and lunch and a great atmosphere in a wonderful home. Check out Linda's blog for any upcoming workshops or happenings in the Vancouver area...

I want to do this again...asap!!

Nov 17, 2009

Imitative Beach Pebble Tutorial - Series 3

I've finally finished part 3 of the Imitative Beach Pebble Tutorial. Use Polymer Clay to imitate Epidote , Lava and Pumice stones.


 $16 (IBP-3)

You can find it in my Artfire shop with the other tutorials or you can purchase from my blog here via secure Paypal checkout and immediate file download. You will first be directed to a page that offers some of my other tutorials on there, also for immediate download.

Shortly I will also list individual rocks, so that you can mix and match which tutorials you want. I will also put together a package for all 3 tutorials in the series for a 10% discount. If you have previously purchased both of my part 1 and 2, send me a message and I will send you a coupon for an equal discount. My apologies ahead of time, but I can only do this through my Artfire Shop as Etsy does not have the feature to apply gift certificates or coupons.
Individual Tutorials for single stones are also going up like these ones:


($6.00 Ryolite)


$6.00 (Basalt Rock)

Nov 3, 2009

Imitative or Faux techniques

Came across a wonderful list of various faux polymer clay techniques.  Ever wondered how to make Lapis Lazuli, Leather or Raku, then have a lookie in Craft Stew!
The site has a lot of other techniques also, such as sewing, crocheting, paper crafts and even woodworking. Don't know why I didn't know about this site until now, but am glad to have found it.

http://craftstew.com/polymer-clay/faux-polymer-clay-techniques

(above image is one of my faux bone cabs)

Oct 31, 2009

Polymer Clay Beach Pebble Bracelets

I could think of a longer name for my West Coast inspired Pebbles, but Polymer Clay in the title is a long word in itself.
I've spent the last few days making more pebbles, mostly in grays and blacks that I will be listing soon, both as sets of beads, but also as bracelets. I prefer the ones with a range of colour such as that I find on the beaches here. For the first time I'm offering a bracelet online. This particular bracelet includes beads that I've made for my tutorials.  This bracelet is for sale in my ArtFire shop.
(Edited: This bracelet has just sold...but I'll go and list another one...and if that one is gone...leave a comment :)

Oct 24, 2009

Need a handle?

I sure could use a hand.  Beads and supplies are still sitting on the porch. I'm constantly having to search for this and that trying to get some orders done. Impossible and I feel bad having to push some order back more than I intended. Hubby is working on the counters as fast as he can, but until we get those back into use organization is out the window.
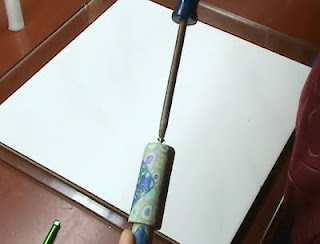
In the meantime managed to make myself a necessary tool - a handle for my Makin's extruder. I found the current 'stick' is hard on the wrist and I even managed to injure myself with a nasty gash while the screw was off. I should warn you...do not operate the Makin's extruder without the screw cap in place, one slip is all it takes.

Quickie Tutorial for Makin's Extruder Handle:


 While I did get inspiration from a couple of sources...we polymer clay addicts look for them everywhere don't we...the pasta machine handle (since it has a spinning handle), a tampax tampon (ahem, the cardboard!), the toilet paper dispenser plastic thingy, the biggest inspiration came from Ritzs who posted on Polymer Clay Tutor (in the comment section). Her idea of a handle is just ingenious! a broom stick dowel and a plastic cotton spool reel. Thanks Ritzs wherever you are!

So, to make a handle adapter, you need polymer clay (scrap will do), waxpaper or teflon baking paper, bit of tape, two washers, a screw, drill and your regular polymer clay tools of blade and pasta machine. Sorry the pics are a bit dark as I did this at night-time.

First roll out some clay into a log or snake, about 4 inches long and 5/8" - 3/4" thick. Bake, let cool. Wrap one half of it with a layer of wax or teflon paper. You'll want to wrap it at least 1/16th of an inch thick as you'll be making a tube that fits over it. That tube needs to spin freely, so don't want to fit it too tightly. Tape the paper.
(Ignore the tube standing on the tile for now, that is actually the next step) Anyway, next you need to roll out a rectangle of clay on your PM at largest setting, measuring 2 inches wide. Wrap this around the wax paper on the hardened clay log. Trim ends and smooth. Cut a circle shape and attach to the wrap end as a cap. Smooth and remove from hardened log. Bake standing on cap. Let cool.

 Test fit over your log. The log needs to be drilled with a drill bit about the same size as the Makin's green handle. You'll notice that the Makin's handle pins have had their ends crimped flat so they won't fall out of the crank hole. Don't drill your clay that big, only as big as the round part of the pin and don't drill all the way through the clay log either, about 1/8" short of drilling through. I could go into details here, but just take a guess. If you do go through...you might need glue. You will also need to pre-drill your log end to fit a 1" long screw. Drill the hole slightly smaller than the width of the screw for a tight fit. Drill the handle cap end the same size as for the Makin's pin (you can see that cap in the previous photo).

To assemble,  place a washer over the pre-drilled screw hole on the log end, put handle cap on, add another washer and insert screw. Screw should be very loose in the washer, but not as loose as for the screw head to fall through. Fasten, not too tightly, you want the handle cap to spin freely.  Finally, attach onto the Makin's pin. May require a bit of pushing, should be a nice tight fit, otherwise, did I mention  glue? I like to avoid gluing as it's messy and takes time to dry.


Here it is assembled...
 

test drive...wroom wroom


Also stores like this...

Have fun!!...(edited) and if you want to buy the one I posted on my ArtFire...I just listed one and includes shipping.
Related Posts Plugin for WordPress, Blogger...