Oct 24, 2009

Need a handle?

I sure could use a hand.  Beads and supplies are still sitting on the porch. I'm constantly having to search for this and that trying to get some orders done. Impossible and I feel bad having to push some order back more than I intended. Hubby is working on the counters as fast as he can, but until we get those back into use organization is out the window.
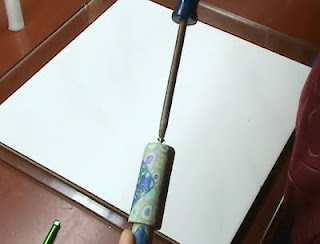
In the meantime managed to make myself a necessary tool - a handle for my Makin's extruder. I found the current 'stick' is hard on the wrist and I even managed to injure myself with a nasty gash while the screw was off. I should warn you...do not operate the Makin's extruder without the screw cap in place, one slip is all it takes.

Quickie Tutorial for Makin's Extruder Handle:


 While I did get inspiration from a couple of sources...we polymer clay addicts look for them everywhere don't we...the pasta machine handle (since it has a spinning handle), a tampax tampon (ahem, the cardboard!), the toilet paper dispenser plastic thingy, the biggest inspiration came from Ritzs who posted on Polymer Clay Tutor (in the comment section). Her idea of a handle is just ingenious! a broom stick dowel and a plastic cotton spool reel. Thanks Ritzs wherever you are!

So, to make a handle adapter, you need polymer clay (scrap will do), waxpaper or teflon baking paper, bit of tape, two washers, a screw, drill and your regular polymer clay tools of blade and pasta machine. Sorry the pics are a bit dark as I did this at night-time.

First roll out some clay into a log or snake, about 4 inches long and 5/8" - 3/4" thick. Bake, let cool. Wrap one half of it with a layer of wax or teflon paper. You'll want to wrap it at least 1/16th of an inch thick as you'll be making a tube that fits over it. That tube needs to spin freely, so don't want to fit it too tightly. Tape the paper.
(Ignore the tube standing on the tile for now, that is actually the next step) Anyway, next you need to roll out a rectangle of clay on your PM at largest setting, measuring 2 inches wide. Wrap this around the wax paper on the hardened clay log. Trim ends and smooth. Cut a circle shape and attach to the wrap end as a cap. Smooth and remove from hardened log. Bake standing on cap. Let cool.

 Test fit over your log. The log needs to be drilled with a drill bit about the same size as the Makin's green handle. You'll notice that the Makin's handle pins have had their ends crimped flat so they won't fall out of the crank hole. Don't drill your clay that big, only as big as the round part of the pin and don't drill all the way through the clay log either, about 1/8" short of drilling through. I could go into details here, but just take a guess. If you do go through...you might need glue. You will also need to pre-drill your log end to fit a 1" long screw. Drill the hole slightly smaller than the width of the screw for a tight fit. Drill the handle cap end the same size as for the Makin's pin (you can see that cap in the previous photo).

To assemble,  place a washer over the pre-drilled screw hole on the log end, put handle cap on, add another washer and insert screw. Screw should be very loose in the washer, but not as loose as for the screw head to fall through. Fasten, not too tightly, you want the handle cap to spin freely.  Finally, attach onto the Makin's pin. May require a bit of pushing, should be a nice tight fit, otherwise, did I mention  glue? I like to avoid gluing as it's messy and takes time to dry.


Here it is assembled...
 

test drive...wroom wroom


Also stores like this...

Have fun!!...(edited) and if you want to buy the one I posted on my ArtFire...I just listed one and includes shipping.

Oct 22, 2009

Making Polymer Clay Bezels and maybe a Ring

There are many ways to make bezels, with or without and extruder. Going to show you how I make some of my bezels with a quickie tutorial.

I love my Makin's Extruder as it has so many possibilities, but one of my fave ways to use it is for making bezels. I like to use the small rectangular extruder disc, but also the one with the 1/8" of a hole (more on that later).

Simple bezel:


Condition some clay, roll into snake and insert into extruder (as per extruder instructions)
Use a small round cutter and wrap the extruded clay around it. Trim where ends meet.
Smooth joins with a needle tool or finger.

Carefully remove bezel from cutter.
Using a cabochon with same diameter (or a baked disc that you previously made with same cutter), insert into the bezel.

 This is ready for any which way you want to use it....

A more decorative bezel and maybe a Ring to wear:

Roll out some clay on #3 setting (I decorate and texture the back of this if for a pendant or when the back is going to be visible - part of another tutorial). Cut out with a slightly larger cutter.

I'm showing cabochon on center of this cut out, just to show you how much of an outer edge the larger cut out has compared to the cab.


Using a round disc for the Makin's extruder, squeeze out about 10" of clay. Some people call these 'snakes', some call it 'log', but this looks more like 'string'.

Trim off about a 6" piece and fold in half.

 Hold left pieces between thumb and forefinger and with right thumb and forefinger start to twist these two strands together.

Keep twisting until you have a nice looking rope.

Take cabochon (without the backing I showed earlier) and place twisted clay rope around it. Trim diagonally so that ends will meet.

 Like so...

 Place back on larger cut out.

Apply left-over string against the rope clay but still on surface of the bottom cut out. Trim where ends meet.
 I like to decorate strings with a cartridge-less pen. It hides the join really well.

If you want to further enhance your cab, you can use some of the extruded strip and cut it into small triangles to apply like prongs...

Then apply mica powder all over your design (Note: as you all know...use a mask if using the metal pulvers). For lighter clays I use a brush...

Finally, bake your design, then varnish and let dry. Maybe glue on a ring shank so you can wear it...

Hope you enjoyed this mini tutorial 


Oct 21, 2009

Handmade Christmas Ornaments

Want to make some Polymer Clay Christmas Ornaments with a Vintage feel to them? This is my latest tutorial. Fall and Winter is going to be a busy one as I want to write a few of them. I"m hoping to blog something interesting tomorrow as well.
Posted by Picasa

Sep 29, 2009

Ancient? Vintage? Modern?


Really had fun with rings today. Creating these big Polymer Clay rings made me think of old as well as modern. While something can't be called Ancient unless its hundreds of years old, and Vintage needs to be at least 30 years old, then these rings have at least an ancient and vintage flair about them.
I made some polymer clay resin cabochons, used some milifiori and some glass...

I have some of the commercial glue on re-sizable rings, but didn't like their look, so made re-sizable shanks with wire inserts. I know that in the photo it looks like just a ring being held in place with a clay strip, but the shanks actually have prongs that are embedded solidly within the clay. The rings are then baked and after cooling I apply further embellishment on the back, so the wire inserts aren't visible. One size fits all. 
What do you think?


Posted by Picasa

Aug 31, 2009

Polymer clay UV gel lamp and cabochons

It is summer, but unfortunately this season we've experienced a fairly cool and wet summer due to El Nino which means very little sun. This means I can't cure my Magic Glos unless I have a lamp. I've found an economical one online, for $25 including shipping, sent from the UK, Sisi-business on Ebay. Am quite happy with it. What I like about it is that it has an off/on button and no timer. Most other ones I looked at on Ebay have either a 2 or 3 minute timer with automatic shut-off which means you'd have to reset it a few times. If you decide to order one, make sure you get the North American plug-in.
While on the topic of curing UV gel, I've found that when applying Lisa Pavelka Magic Glos on Polymer Clay pieces that the gel would always recede or pull away from the edges. I'd then have to apply 2 or 3 more coats or layers to fix and even then I might miss part of the edge. This would use more Gel than I'd like. Frugal me, the gel is fairly costly at approx. $9 an ounce. Apparently it is now available in 6 oz bottles too which will serve me better since I like to use it a lot, lol.
I've finally found a solution to avoid the 'pulling away'. It's so simple I wish I had discovered it sooner! By applying the Gel first around the rim of the piece and curing it, the gel won't recede.


Then I apply the second layer, filling the center of the cabochon and around the edges again, giving the piece a 'domed' appearance. Cure a second time. Afterward a little sanding around the edges will fix any rough edges. I'll show you tomorrow what I do with these pieces...

Aug 26, 2009

Beading amongst Chaos

It is time for some beading and assembly.
I have various things on the go and its hard to decide from day to day what needs to be done next. I wish I had done a few more polymer clay focal pendants before starting on assembling.

Right now I'm working with my recycled glass beads and my stuff is everywhere. I don't know about you, but for me it is impossible to create unless I have a lot of things available to me visually and I mean a LOT. I have drawers full of supplies, but what good is it when they aren't right there to say...oh yes, that colour would go nicely with this bead.
When I need to clay again, all of this has to be cleaned up.

So this is what is on my desk right now...My teeny work surface, but its enough for assembling one thing at a time...

And this is what is on one of my little side tables (I have two others)...wire, cord, beads, ultrasuede bits...

This is what I finished today...some necklaces

some lariats...

Closeup of a recycled glass bead...I got these from Africa...

Close up of one of my polymer clay sea urchin cabs...

Aug 6, 2009

Imitative Beach Pebble Tutorial - Part 1


I'm pleased to announce that I can finally offer you a tutorial for imitative beach pebbles. With only a few colours and tools you'll be able to create a range of beach pebbles that'll fool the naked eye. The only deception is their light weight. Inspired by real beach pebbles, in this lesson you'll recreate veins, textures and ocean tumbled forms. Create stones of any size or shape, and then drill them with ease. Part 1 will show you how to create 4 types of basalt rocks, 2 with 2 techniques of achieving quartz veins (one slightly cracked, one banded). One black basalt rock with different shading, cracks/marks that enhances realism and one with a quartz inclusion. Lastly some red Jasper with inclusions and some tips and tricks to make your pebbles stand out.
Pasta machines for this project are entirely optional.

This tutorial is packed with 63 photographs, 22 pages, and 55 steps of instructions. Available on Artfire.

Part 2 and 3 coming soon...

Which one or ones are the fakes??
Related Posts Plugin for WordPress, Blogger...