Showing posts with label sea urchins. Show all posts

Apr 5, 2017

Imitated Nature

For those that don’t know I love to recreate things found on the beach with polymer clay. That’s also where my choice of name ‘Beadcomber’ came from, beachcombing.
I know a couple of my pieces are missing from this photo, namely a sea star or starfish and a whole sea urchin, but I wanted to see how a group shot of my handmade bits would look like. Sea urchin piece, sea glass, driftwood, pebbles, shells and my most recent addition, sand dollar.
The Sea urchin, driftwood and shells are made in a similar way with the help of chalk, the sea glass is made from a liquid form of polymer clay and the sand dollar is caned or made with a method called milifiori which is based on a technique that was originally used in glassworking for making complex designs.
DSC00045faux nature
So what is a cane? It’s a log or cylinder of clay that has a design running through it, so each slice of the cane - the cross-section - contains the design. I made a cane that measured approximately 2 inches in diameter and the larger the design, the easier the cane is to handle. It can then be reduced in size by pressing, stretching and rolling it so the cane becomes longer and thinner and the design becomes smaller along with it. Then when cutting slices from the cane, the design will look the same front and back.
DSC00021sand closeup
I have tutorials on all, except for this and the driftwood. They can be found Here. Just look for the Download Category with Tutorials. If you want some sand dollars or other things, I have them too!

Mar 19, 2013

Bead Soup Blog Party Partner: Jen VanBenschoten

Looks like I’m skipping Phase 3 of my Vases instead of adding the other components I had prepared. I decided I liked them better as they are with the bright faux abalone speaking for itself. Sometimes ‘less is more’.

About more! I’ll have some more beading to do!! About a week ago some gorgeous beads showed up in my mailbox all the way from New Jersey. My Bead Soup Blog Party partner this year is Jennifer VanBenschoten. Beaders should be familiar with the name because Jennifer is the Editor of  Interweave Press’ Beading Daily! ‘Beadwork’ and ‘Step by Step Wire Jewelry’ magazines are just a couple of fabulous hardcopies that Interweave publishes. I’ve had the pleasure of having a wire macrame tutorial published in a past issue of Step by Step Wire. I need to renew my subscription!

When I opened the package and read Jen’s note I had to giggle…yes I LOVE sparkle! Jen hit my taste spot-on. Jen sent me two bead soups. The colours are amazing and look at the dichroic cabochons!! The clasps are beautiful with colour reflecting vintage swarovski crystals.
DSC07988DSC07989

I’ve already started on the purple set of beads, but can’t show you yet what I’m making, although I may post a sneak peak soon. Jen and I are in the 2nd reveal of the 7th Bead Soup Blog Party which takes place on April 6th. You can visit Lori Anderson’s blog to learn more about this annual Party which this year tops 500 participants from all over the Globe!

I sent Jen some of my handmade beads. Will be fun to see what she’ll create with these.
DSC07901DSC07900

Jun 10, 2010

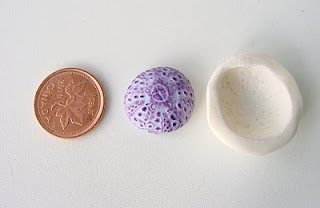
Teeny Polymer Clay Sea Urchin Molds and Beads

I've been spending some time this week creating smaller sizes of sea urchin beads from polymer clay. I'm also offering the molds as well so that anyone can craft realistic pieces for their summer or other craft.
For the sea urchins the sizes measure from a scant 18mm (shown) to 35mm. Sizes are approximate since one can slightly distort the beads smaller or larger from the mold. The small one here is a little smaller than a penny.(CDN and US pennies are the same size)
Different starfish molds are also available. Sizes are 30mm to 65mm. I've listed these in my ArtFire.


Aug 26, 2009

Beading amongst Chaos

It is time for some beading and assembly.
I have various things on the go and its hard to decide from day to day what needs to be done next. I wish I had done a few more polymer clay focal pendants before starting on assembling.

Right now I'm working with my recycled glass beads and my stuff is everywhere. I don't know about you, but for me it is impossible to create unless I have a lot of things available to me visually and I mean a LOT. I have drawers full of supplies, but what good is it when they aren't right there to say...oh yes, that colour would go nicely with this bead.
When I need to clay again, all of this has to be cleaned up.

So this is what is on my desk right now...My teeny work surface, but its enough for assembling one thing at a time...

And this is what is on one of my little side tables (I have two others)...wire, cord, beads, ultrasuede bits...

This is what I finished today...some necklaces

some lariats...

Closeup of a recycled glass bead...I got these from Africa...

Close up of one of my polymer clay sea urchin cabs...

Jul 1, 2009

Polymer Clay Tutorial on Sea Urchins published

The much anticipated tutorial is now published on Artfire. If you've wanted to create your own sea urchins from polymer clay, I now have step by step instructions published.
First I will show you how to create a mold from a real sea urchin (ready made molds are also available for purchase).
Then you will go on to learn how to create a hollow polymer clay sea urchin and finally you will learn the effect of color for added realism.

This ebook is packed with 35 steps, 43 photographs, and 16 pages.

As I said, ready made molds are also available so that you can...

Jun 19, 2009

Polymer Clay Molds and Cabochons

I finally made some Polymer Clay Sea Urchin Molds and Cabochons for sale.

I've been asked at various times for a tutorial on Sea Urchin related things, but I've also been told that it isn't always easy to find sea urchins to make your own molds from, so decided to offer up a few.
I will still write a tutorial for the "whole" ones, but it will take me a while since I'm so busy these days.

Still, it is almost summer and you may wish to use these textures as soon as possible for your own projects.

With sea urchins in mind, I'm also offering sea urchin cabochons in various shapes and colors for the beader and beadwork or the polymer clay crafter to incorporate these into their own polymer clay projects to be rebaked.

You can find these in my Artfire or click on the Artfire on my right sidebar.

Apr 26, 2009

Steam punk Turtles, Urchins and Flowers

Spent this later part of the week with some Polymer Clay play. Created some Turtle pendants and Flowers. Some of the Turtles are Steam punk....or Borg, whichever term one prefers. Some of the turtles have glass backs. The urchin has a wire wrapped cage.


For the flowers I used Lisa Pavelka's technique, the foil tear away method. One of the pendants has a blue agate, the other dichroic glass. I glued those in and then used Magic Glos. Worked beautifully on a sunny day, but had to do a few coats.

Nov 26, 2008

Polymer Clay Cuff Bracelets on PVC

Reduce, reuse and recycle. How handy that hubby had some PVC pipe left overs in his studio. He cut them up for me and I used them on these polymer clay bracelets as well as some boxes. Made a whole bunch, but now am out.
I guess not all piping is the same because some will 'melt', some will soften and can be reformed and others aren't affected by baking at all.
To continue making some other types of bracelets, just ordered some great aluminum blanks from Melanie West.

Oct 30, 2008

Polymer clay kelp box

More wire curls and polymer clay.
This box was a bit of a challenge and took 2 days. It's made entirely from clay which means it's not only heavy, but used a lot of clay and required multiple firing. The entire box is 9" tall including the wire curls and legs, but the box without wire measures 5.5 long x 4.5"wide and 3 1/2 inches tall which may not sound like much, unless one takes the 1/4 inch thickness into account. The biggest challenge was the firing and impossible with the height even without the urchin and wire curls. Moved the rack to lowest position and surrounded the box with an aluminum foil tent after my last crisped item. My convection oven is teeny and really 'stunts' my creativity in wanting to create larger items. So, I baked the urchin and wire alone and super-glued it in the end. The finish of the inside bottom is much the same as the textured outside, with the internal sides painted with an acrylic 'moss-like' painting.
I'm beginning to like the wire curls....

Oct 28, 2008

Wired Polymer clay Boxes with a Surprise

Hope you can forgive me for not posting for almost 2 weeks! Here are some wired polymer clay boxes...or should I call them weird? I've been trying to achieve a more organic look with my clay and foregoing the use of any lacquer or varnish. I still work with sparkle and shine, but for this look it just doesn't work.

This busy box got a bit outa hand...

Some boxes are entirely made from Polymer Clay, others use a paper mache base.
Am still working with the sea theme of using starfish, urchins and scallops.

Got the idea of putting a surprise under the lid when I burnt one of them during my multiple baking phase. It was a mistake to move my rack to the lower shelf and not using aluminum foil as a shield! The initial reaction is a big "oh no!" , but as it happens I don't give up so easily and the mistake gave me the idea to add a starfish and make the rippled rock-like surface part of the design.
I will still post on those glass tiles, hopefully this coming week. Could kick myself for not taking pictures of the jewelry I made, but we were in a mad rush to get things done and deliver them to a gallery in Victoria.

Jun 4, 2008

Inner and outer space

I have to admit, that while making these sea urchins and thinking about what fantastic creatures lurk beneath the sea, that the polymer clay aspect of these molded creatures takes on a bit of a sci-fi look when treated with different colours. Here are some unfinished pieces but all around am very pleased how they turned out. Those nippled pieces could make some cool Turtle backs.....will see how they turn out....

The round urchins were a challenge, especially since I made mine hollow....
Related Posts Plugin for WordPress, Blogger...