Mar 31, 2016

Have you made your 10 x 10 for the Fimo World Project yet?

Covering the World...in 10 x 10 squares.
Here is the Facebook Group link https://www.facebook.com/groups/1810793605813598/
There is still time to make your project. Here is what I submitted. And yes I used Fimo. I switched back to Fimo (Professional) after a long absenteeism. Why did I switch back? Because I got tired of the inconsistencies with other polymer clay.
True, some say Fimo is a bit harder to condition, but if you have spent enough time with polymer clay, you'll soon appreciate why after a bit of  handling, the rolling snakes to a fine tip without a hitch makes it THE reliable clay. I don't mind whacking it a bit with my acrylic roller before putting it through the pasta machine, I actually enjoy it! lol

So here is my 10 x 10 titled 'Nautilus'. It's an 'Aquarium style' with free floating beads. I used Black Fimo Professional, my crackle technique (tutorials are on my website http://beadcomber.com). I even used some Fimo Metal Pulvers I still have in my stash. The metal vs. mica is obvious.


While I was at it, I also created one of my Aquarium Pendants...Want to see a tutorial? or two? I'm almost finished with an Aquarium pendant tutorial and then I'll share "Secrets of the Nautilus"....

Jan 31, 2016

2016...

I didn't mean to ignore my blog, but Facebook seems to have taken over in that regard. Still, I reminded myself that this blog isn't just there for others, but a journal for myself. Today I posted some pendants on Facebook with the intent of selling them. I haven't gotten them posted to my new Website yet and if I should also list them on Etsy since it's always been a good venue for me. I go back and forth quite a bit and it's so difficult to know unless one has stats etc. which I rarely look at because I just don't understand it that much. I just want to create!
I enjoy creating multi-colored pieces. I love Lotus, Owls and Sea Urchins. Right now the Cabochons are just that...discs, but I can drill them any which way, they can become earring pendants, maybe even matching necklace pendants or buttons! I made 3 colors of a simulated Ceramic finish with a Lotus, Owl, and Sea Urchin design that I created from my own textures. I can drill holes, just tell me top, bottom, middle. oh...and if I make buttons they can be put in a washer and dryer without worry.


I charge more for these on Etsy (because of the fees) but offer a special deal on them...The Owl pendants measure about 22 mm ($6/pr), the small urchin rounds 20mm ($4/pr) the large urchin 36mm ($5) and the lotus 30 x 38mm ($5). I have multiples of each. Grab them fast as I only make so many (unless you do a custom order) Just comment or message me your email, how you would like them drilled. Prices are in US currency. Shipping to US is $5.50, Canada $3 and I even ship International $8.75. I know...Canada Post takes a big bite...
oh...and check out my new website at http://www.beadcomber.com/

Jan 10, 2016


Aloha!


The kit is up for purchase
The Aloha Necklace Kit that I'll be teaching in May is now available. There are a limited amount of these. I've listed 12 but there will be more, but need to count all my materials as I've also started to list separate components if you want only some of the parts.

Sign up for the Virtual Retreat here...Take classes at YOUR leisure, all year long...Go to the site and have a look at the Calendar of events, meet the teachers etc.
http://bit.ly/AJA-VirtualRetreat

This kit is for the Aloha Necklace that I'll be teaching in May


Cheers! :)


Oct 19, 2015

Special announcement! New Art Jewelry Adventure 2016!

 
News!!!
It’s been a while since I posted here, but well, I'm so excited and wanted to share this with you and can't wait any longer! 
AJAWinIt

This is the first time I'm participating in the Art Jewelry Adventure 2016 with 19 fabulous teachers some of whose names you will be familiar with.

PLEASE help me SHARE the POST on any social media platform or with your guild or other polymer clay/bead group and ENTER with my links below to win. Simply clicking on the first link shows your support for me and the second is to be entered into the Contest. I'll announce a winner on Saturday the 24th. Also, if you enter the Contest I'll be entering you into a drawing for something personal from me.

Sales Begin Next Sunday the 25th

This is the class I'll be teaching...Aloha!

TinaHolden

There are classes in soldering, torch fired enameling, resin, quilling, soutache, wire work, molding, mixed media (painting, stamping) shrink plastic, silver clay, epoxy and polymer clay. We have tried to keep it down to materials you can easily get and nothing requires a kiln- so maybe you might need to pick up some things you don't have if you want to try something new, but the most "exotic" thing you might need is an inexpensive butane torch!

There was a contest, but sorry you missed it...you can still sign up for the classes tho!

Tina


Jul 29, 2014

Gilded Paths Surface Techniques

I finally finished another tutorial after starting quite a few and not finishing them…yet, however…

Collages4

The tutorial guides you with 49 steps, 58 photographs and 18 pages which includes a Resource list at the end. Use a variety of simple surface techniques as a foundation to add onto with the use of stamps, textures, mica pearls, chalks etcetera. The tutorial also offers plenty of tips to incorporate into your own pieces. Create sheets of clay to use in various projects such as to wrap pens, crochet hooks, bangles or as journal covers, to create buttons, beads, pins, jewellery etcetera, or whatever you imagine. This project is technique based, so the projects are up to you. Here are some examples of easy works that I made using these techniques which you can leave as simple or enhance as lavishly as you want.

DSC00012DSC00016

DSC00006

The projects are up to you, but here is a way to make quick ring dishes with some of the treated sheets.

2014-07-24 12-17-29.0722014-07-24 12-17-43.625  

2014-07-24 12-18-32.0162014-07-24 12-22-29.945

2014-07-24 12-22-43.6122014-07-24 12-25-30.338

2014-07-24 12-28-43.4072014-07-24 12-29-00.125

I stacked two sheets, cut a large circle. Molded on a small glass ball. Cured in a dish of sand or on an oven safe nylon cutter. Voila!

You can download your copy of Gilded Paths Techniques on my Etsy or purchase it from my Zibbet shop and I’ll email you the copy shortly after.

May 10, 2014

8th Bead Soup Blog Hop Reveal!

I planned on publishing this right at midnight or earlier this morning, but for some reason my Windows Live Writer wouldn't publish. It just kept on saying "publishing your post" with the little animation of files going to my blog, but nothing ever happened. I decided to copy this post over to Blogger, but it wouldn't copy the photos, my font etc, long story short...Time flies and I'm late!
This is my reveal. I admit that Participants of this Party are given plenty of time to construct something with the bead soup each partner challenges one with, but I constantly struggle with prioritizing my time. Juggling family, a special needs adult at home, work and then trying to fit in some fun ‘me’ time is difficult. Somehow I get it done though. I’m glad Lori Anderson, our amazing hostess extraordinaire, of this Party and blogger of http://www.prettythingsblog.com/, gave us an extra week as she struggled through some issues of her own. So...I managed to make all these yesterday!!! Just in the nick of time!
My Partner Fay Wolfenden  http://torchfairy.blogspot.ca/ is a fellow BC Artisan who lives in sunny Kelowna which is located in the Interior of BC. Fay creates yummy lampwork beads. Here is the bead soup Fay sent me…(I lost my photo of the stash, so snagged hers. Hope you don’t mind Fay)


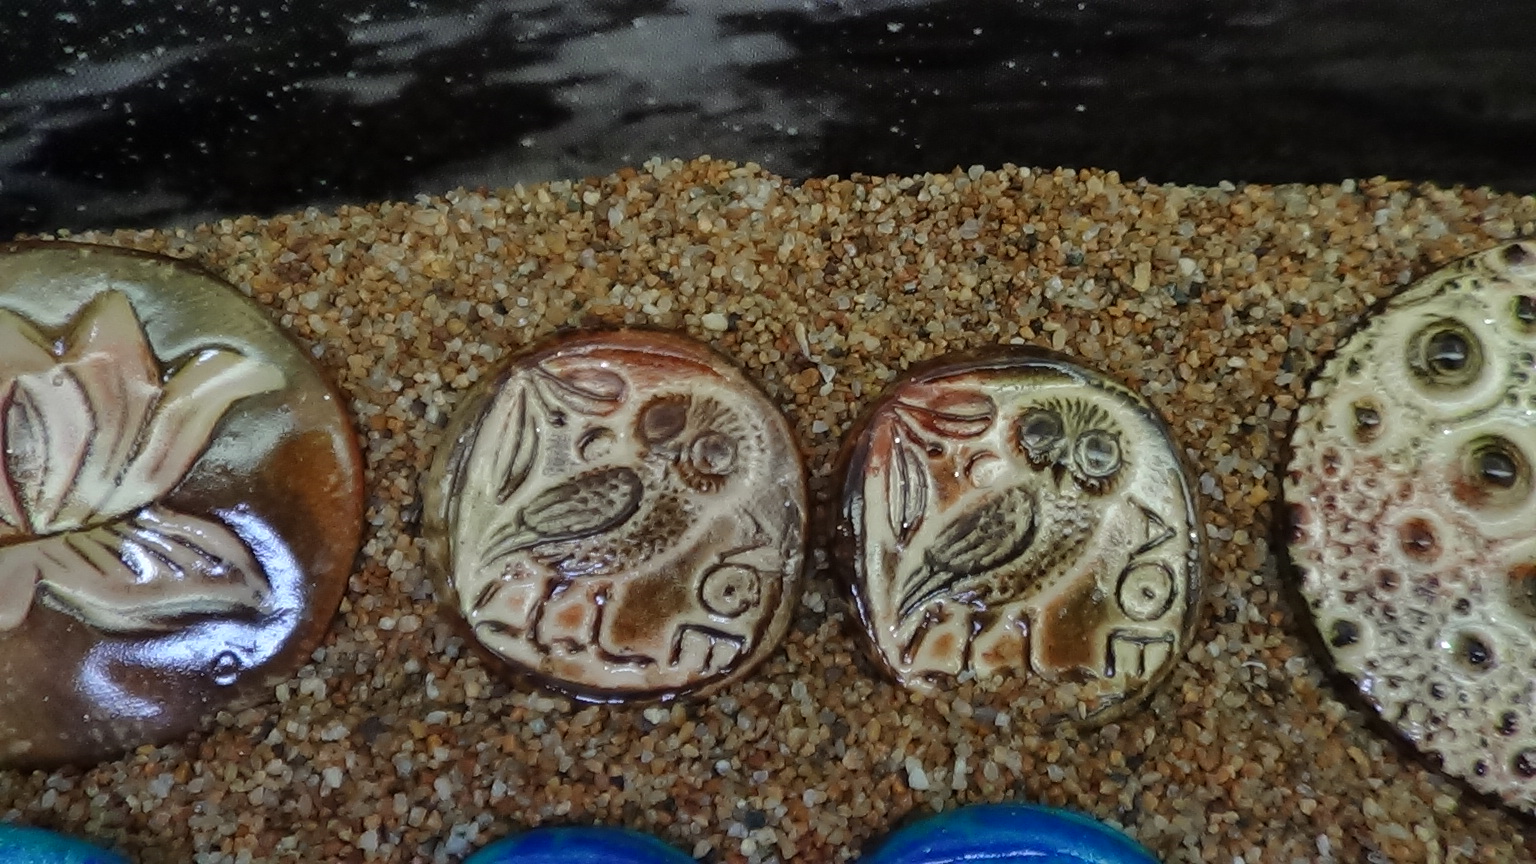
Fay included a couple of sets of handmade copper clasps along with her beautiful lampwork. Owls!! How did she guess?? Maybe she read my mind because I very much like owls! Blue and purple are some of my favourite colors to work with. There are also a pretty lampwork flower bead, more of her fun dotted lamp works, some purple copper swirl beads, metal copper tone beads, glass pearls, crystal and vintage glass. Fay sent me natural  and dark copper wire (not pictured) linen and ribbon. Oh, what a challenge! lol
Here is what I sent Fay…


I included one of my handmade button clasps and a large polymer clay focal. The soup includes mother of pearl, coral, jade, Chrysoprase, cultured sea glass and some copper findings. Can't wait to see what she does with these!
OKAY…here is my big reveal! I used every item, that Fay sent me!…but for one.


  I really wanted to challenge myself to use it ALL! The thing that got me was the natural linen. Maybe it reminded me too much of hemp. My husband is the hemp champion knotter, but my fingers just don’t fly like his, lol. So after a few attempt I gave up. I did use the black linen and ribbon though! I crocheted the black linen, then braided 4 strands of it together.  All that I ended up left with are 6 teeny golden pearls. Pretty good, eh? From my collection I incorporated the chains, rings, crimps, silver toggle, headpins, ear hooks, the green faux sea glass and some copper flower heishi beads.


Here are some of the items from the collage…I used the hammered wire clasp as part of the focal, and used the S part as the clasp only. I think it works.

Which is the nicest...to give to my mom for Mothers Day?? She likes both necklaces and bracelets...

Also at your leisure, check out the many Participants and links here…http://lorianderson-beadsoupblogparty.blogspot.ca/2014/05/8th-bead-soup-blog-party-participant.html

Mar 2, 2014

Rigid and flexible molds for Polymer Clay

I use both rigid and flexible molds. Flex molds are becoming so popular and they are certainly easy and fun to use. One or the other may not necessarily be better  however. Depending on use, a rigid mold can sometimes give better and cleaner results. The rigidness of a mold allows for more control and prevents the design being molded from getting stretched and distorted. Flexible molds are great for when the item is rounded, like a button for instance. Rigid molds are impossible to use for a rounded object like a sea urchin that has a bit of a curved underside. In this example you can see the advantage of being able to stretch a mold to pop out a 3 D item, without distorting the curvature and details and you can virtually turn the mold inside out.
20140302230134(1)20140302230134(2)20140302230134(3)
Flexible molds do have their limitations however, in that it is difficult to create texture plates with them. If one has a large surface area to cover such as creating a 4 x 5 sheet, for example, it’s pretty much guaranteed that one will either end up with an unevenly textured piece, that is some areas will be more deeply impressed and others not enough and some of the details may look stretched. Even if one is successful in creating a texture plate with silicone rubber, creating a positive from such a large mold is difficult as the rubbery texture will shift and distort the image you are trying to copy. Another limitation with the flexible nature of such a mold is that if you are trying to create an equal front and back for a pendant, the stretchy nature of the mold might cause one to end up with 2 slightly different sized pieces.
Here is a short version tutorial on how to create a 2 sided item using a rigid mold.
clip_image002 Materials: 
  • Polymer clay such as Fimo which is my new /old preference, but you can use any of the polymer clay brands.
Tools:
  • · Tissue blade
  • · Rigid mold made from polymer clay
  • · Water
  • · Soft or absorbent brush, or small spray bottle for water
  • · Rubber chisel blending tool
  • · Needle tool
  • · Small metal spatula or exacto knife
  • · Texture such as coarse sandpaper or rough craft foam
  • · Small textured bead or stamp to hide seams
clip_image004 Step 1: Spritz or brush your mold with water. If you are going to use Fimo to cast from the mold, then do not use water as it will make the Fimo sticky. Use corn starch instead.
clip_image006 Step 2: Condition clay, roll into ball and press into the mold. Starting in centre of clay press outward to edges of mold.
clip_image008 Step 3: Use tissue blade starting at about centre of mold and slice away excess. Use the edges of mold as a horizontal blade guard or as an indicator of how much excess to trim. Hold the blade as horizontal as possible as not to slice into the mold. It’s kind of like slicing multi levels of colour clay for mokume gane.
clip_image010 Step 4: Turn the mold 180 degrees and slice away clay excess on other half.
clip_image012 Step 5: Using your thumbs, push the clay toward centre of mold or away from the edges of the mold.
clip_image014 Step 6: To remove the clay from the mold, press onto coarse sandpaper or a coarse craft foam texture.
clip_image016 Step 7: Mold should lift away, by causing the clay to stick onto the texture, but if it doesn’t…
clip_image018 Step 8: …you can also use a small metal spatula or needle tool to carefully lift the edges up and then the molded item is easier to remove.
clip_image020 Step 9: Create another piece as before and then mount the 2 pieces together matching the edges.
clip_image022 Step 10: With a rubber chisel tip you can easily blend and smooth seams. You can also use your fingertips to gently pinch the largest seam together first and then use the rubber chisel for the finer details.
clip_image024 Step 11: Seams won’t then have any of the texture. To camouflage you can create a similar texture by using the sandpaper to impress a little bit of texture over the seam, use part of the mold itself, or…
clip_image026 Step 12: If you have any metal beads with an interesting texture that matches, you can use this as a roller on the seam.
clip_image028 Step 13: This pendant is done. All it needs is a hole for stringing and a bit of colour. One of my favourite method is to use mica or metal pulver on black for an antique metal finish. Of course you can choose any colour you like.
Find my latest molds, both rigid and flexible in my Etsy shop
WWW.beadcomber.etsy.com

I’ve added a variety of molds to my shop including this Raven Thor Hammer Pendant mold. There is another hammer, a Sea Horse, Mermaid, Egyptian Themes and much more. I’ll be adding more tonight!

Feb 2, 2014

Spiky Elegance Bangle Bracelet Tutorial

I forgot to tell you about my latest tutorial! While it’s not persé a Polymer Clay tutorial it could certainly work with polymer clay beads! A while back I created faux rock spiky beads and used a shambala style clasp, that is with the macramé pull strings. The tutorial shows how to attach metal clasps and beadwork, but you could add the cord pull strings.

This is the initial bracelet I made with the polymer clay beads

DSC01483

And this is the Tutorial. It’s in all my shops, including Zibbet.

08-09-2013 spiky bracelets

Related Posts Plugin for WordPress, Blogger...