Jan 10, 2008
Polymer Clay Toggle Necklace
Made several toggles clasps and need to string them. That's one down, several to go. I made this necklace with a hammered wire scroll concept. The necklace has polymer clay beads, Kambaba Jasper, Turqouise Beads and measures 22 inches plus the leaf toggle. The wire I used is known as baling or stove wire.
Jan 9, 2008
Toggles and Beads
Decided to spend a day making Polymer Clay Toggles and a few Beads. Never could find any pleasing CLASPS to go with my polymer clay work, especially when I don't always want to use metal ones. Sometimes I like the look of a functional clasp in the front that can act as a pendant. Now comes the hard part....trying to decide how to string them, whether to use just polymer clay beads and a few other types of beads or whether to go out on a limb and do something a bit more elaborate which includes wire or wire crochet. Will see. I may do a bit of both. These pics really don't do the toggles justice, but I just didn't have time nor the place to set up my lightbox. My daughter is moving....can you imagine trying to work around piles of laundry? lol
Tomorrow I make some toggles in other shapes...
Labels:
beads,
clasp,
pendants,
polymer clay
Jan 6, 2008
Conditioned and ready to go...
Oh Boy...what am I getting into! I knew I was procrastinating for as long as possible...but my New Year's resolution was this ONE thing...cleanup and organize...as soon as NOW!
Truly a 'fresh' start. Two days later finished conditioning all my old clay pieces, sorting them by similar colours and used the little foodprocessor or 'chopper thingy' until the poor thing didn't want to chop no more. I blended dry Fimo with Premo, Kato Polyclay and even some old Promat. Boy, I didn't realize I had so many open packages,!! Got some nice blends though and love this red one....
The Sculpey Diluent (now called Sculpey Softener) helped tremendously. I've got some nice soap sized bars of various colours now. The BEFORE picture is only a small picture portion of what mess I faced on my work table, but its all cleaned up now and yeah, I'm soooo GLAD I kept my New Years resolution ...for once!
Malachite anyone?
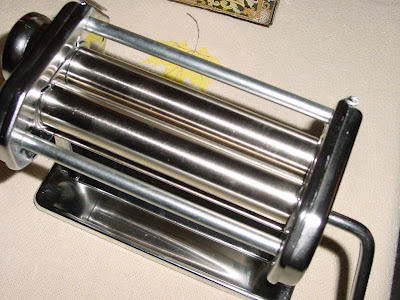
Also cleaned my 3 pasta machines following this method by Desiree. Although I couldn't get the cutting rollers out of my one machine that looks like a Trattorina , I took all the fenders out of the machines, lightening their weight and making it easier to clean next time.
Jan 3, 2008
Mixing Old or Hard Polymer Clay
Must say, I have one of these blenders and I haven't used it yet, but then I have avoided my old stock of Fimo far too long. This easy to follow tutorial makes it a breeze....time to make 'popcorn' (I think it resembles 'cottage cheese' more closely)
Jan 2, 2008
PC - with love from Russia!
Well, at first glance this isn't what you may have expected. After all, this blog is supposed to be about PC, the polymer clay kind, not the personal computer variety. However....just take a closer look! If you live in Russia, you can get a wooden PC. Instead of all the boring grey or black plastic panels you get a masterpiece made of the finest mahogany with each small detail precisely curved and polished. Mmmmmm....perhaps someone is up to the challenge of making a Polymer clay one? Plastic melts tho...that is a challenge.
Jan 1, 2008
Polymer Clay Artists- Happy New Year!
2008!...another number bytes the dust, but another creative year ahead with hopefully lots of Polymer Clay Bytes to add here.
With so many Polymer Clay Artists around the world, some familiar, some emerging, here are just a few artists that give us non-caloric eye candy. After all those chocolates most of us will put ourselves on one diet or another, so more EYE candy, please!! I chose these artists at random and since I don't want you to feel left-out, please send me your links for future show and tell!! ;) (leave your name in the comment box or email me....)
Beginning with Canadian artist Margi Laurin we get some spectacular glimpses into the magic of polymer clay with an array of kaleidoscopes and magnetic poseable pieces such as this:
Lithuanian polymer clay artist Rasa Lazauskaite. Beautiful milifiori and outstanding colour palettes. (How does she do the drawings?! I know that Oil PENCILS are being used for the faces, but all I can find are the crayons in stores, not pencils....anyone know where to get these?):
Spanish Artist Tatana. I think these flowers are gorgeous...
French artist blog with wonderful 'hidden magic' au fil des pates
British Artist Hetty Scott creates some cool 'Geode' boxes from Polymer Clay:
Australian Artist Joanne Scriha who makes the cutest little fairies...
USA artist Julie Picarello of Yellow House Designs. I love the hues of earthy colours...
And back to Canada! Canadian polymer clay artist Georgia Ferrell is also giving us a glimpse of possibilities with some imaginative kaleidoscopes and games. Georgia will be teaching a workshop in making Tumblescopes at the upcoming 'Sojourn' in February. There is still room for this much anticipated workshop. It has a January 25th deadline. Classes and demos are filling up quickly, so don't wait to miss out on this opportunity. Check out the Sojourn blog for the interesting venue, events and contact information.
for some more
With so many Polymer Clay Artists around the world, some familiar, some emerging, here are just a few artists that give us non-caloric eye candy. After all those chocolates most of us will put ourselves on one diet or another, so more EYE candy, please!! I chose these artists at random and since I don't want you to feel left-out, please send me your links for future show and tell!! ;) (leave your name in the comment box or email me....)
Beginning with Canadian artist Margi Laurin we get some spectacular glimpses into the magic of polymer clay with an array of kaleidoscopes and magnetic poseable pieces such as this:
Lithuanian polymer clay artist Rasa Lazauskaite. Beautiful milifiori and outstanding colour palettes. (How does she do the drawings?! I know that Oil PENCILS are being used for the faces, but all I can find are the crayons in stores, not pencils....anyone know where to get these?):
Spanish Artist Tatana. I think these flowers are gorgeous...
French artist blog with wonderful 'hidden magic' au fil des pates
British Artist Hetty Scott creates some cool 'Geode' boxes from Polymer Clay:
Australian Artist Joanne Scriha who makes the cutest little fairies...
USA artist Julie Picarello of Yellow House Designs. I love the hues of earthy colours...
And back to Canada! Canadian polymer clay artist Georgia Ferrell is also giving us a glimpse of possibilities with some imaginative kaleidoscopes and games. Georgia will be teaching a workshop in making Tumblescopes at the upcoming 'Sojourn' in February. There is still room for this much anticipated workshop. It has a January 25th deadline. Classes and demos are filling up quickly, so don't wait to miss out on this opportunity. Check out the Sojourn blog for the interesting venue, events and contact information.
for some more
Dec 31, 2007
Dec 30, 2007
Wire Inspirations for the New Year!
A few wire things I have done in the past. Couldn't find a bigger picture of the Gold Viking braid I made in 1994 (below). I made this one with a variation by braiding in Carnelian and Pearls. The second picture I used Sterling Silver Wire and semiprecious stones and for the star I used Sterling silver and Labradorite.
Just a couple more days and we'll ring in another "Yar". Right now the decor of Christmas Lights, Trees, Ornaments, Poinsettias and other Decor is keeping me away from getting to my crafting supplies. Only a bead addict can understand how badly I want to pack away the Holidays and get started again! lol
I have a few projects waiting to be finished, including a Herringbone stitch necklace rope. I've made a few of these, but finding interesting ways to end them has always been a challenge. I made some from polymer clay which look alright when the pendant is also polymer clay, but when the pendant is beadembroidery or wire, then those endings should also match these focal points in some way. For wire pendants I wanted some metal endings and yesterday I found my muse by stumbling upon this cool website by Iza Malczyk, a polish wire artist. (My parents are both polish born, but thats another story). She has a tutorial for the end cap in the Summer 2007 issue of the Step by Step Wire Jewelry Magazine. The tutorial is also available on her Etsy site. I think this will be the perfect ending for some of my projects (pun not intended).
Like Iza, I've learned a few things from the renouned Eni Oken
Eni has some great tutorials on her site. They are quite reasonably priced considering the many pictures and pages that go with each tutorial. Some are even free!
Dec 27, 2007
what a fun swap!
This was a SWAP! hosted by the Canadian Beaders swap in Yahoo Groups. The theme was the 31 days of Christmas and involved handcrafted and purchased things. Polymer clay and Beadwork was a big inclusion. The participants were given a partner for whom to create a box full of Christmas related things. Each day involved a project, one day would be a handmade card, the next an ornament in a specific theme such as a candycane or snowflake, an ATC, a snowman.... I received many polymer clay ornaments, ribbons, beads, chocolate, scrapbooking materials. I'd say my partner outdid herself and I feel spoiled! Thanks Heather!
Dec 5, 2007
What are YOU up to.....
Haven't posted for a while because, if you saw my previous post, I was up to my ears in 'training' my new Vista. Finally got it settled some, but still working out a few kinks.
Then there was the 'dusting' and clean-up and bringing out the Christmas Decor.....yeeha!...argggh...first I needed to put up the shrink plastic window insulating stuff on two windows today. Looking forward to a colder winter and trying to conserve energy...then vacuuming behind the furniture and DUSTing everywhere, mopping the floors, vaccuuming the ceilings and corners. Then went shopping, driving 6+hours and I'm pooped, but still need to pack all the groceries away, the family sized meat packages into individual baggies and organize the cupboard with the fully stocked items. Finally, at 10 pm, plop on the couch....and at least one of the daughters decorated a little....oooohhhh how NICE!
What about my other creative outlets!?
Ok...I have to admit, I haven't been claying much. Not at all! Shame on me!
The excuse is a valid one. My work space is limited to one teeny desk right now, especially with Christmas around the corner. VERY LIMITED, almost tearfully so. When I don't have the room, I just can't get anything done! I need a large amount of visual stuff and having things in drawers....ahem, that doesn't work. When I clay, I need my foils, stamps, cutters, tools, papers, crystals, textures, inks.....I have to figure out SOMETHING!! because " Out of sight is out of mind!" That doesn't work. I need visual cues. I need some help! How can I be an artist when everything is packed AWAY.....
There is a small show on Saturday and tomorrow I will have to do a mock-setup, just so I don't have to fuss with it too much when the time comes.....
Subscribe to:
Posts (Atom)