Oh what fun....

Dec 30, 2007
Wire Inspirations for the New Year!
A few wire things I have done in the past. Couldn't find a bigger picture of the Gold Viking braid I made in 1994 (below). I made this one with a variation by braiding in Carnelian and Pearls. The second picture I used Sterling Silver Wire and semiprecious stones and for the star I used Sterling silver and Labradorite.


Just a couple more days and we'll ring in another "Yar". Right now the decor of Christmas Lights, Trees, Ornaments, Poinsettias and other Decor is keeping me away from getting to my crafting supplies. Only a bead addict can understand how badly I want to pack away the Holidays and get started again! lol
I have a few projects waiting to be finished, including a Herringbone stitch necklace rope. I've made a few of these, but finding interesting ways to end them has always been a challenge. I made some from polymer clay which look alright when the pendant is also polymer clay, but when the pendant is beadembroidery or wire, then those endings should also match these focal points in some way. For wire pendants I wanted some metal endings and yesterday I found my muse by stumbling upon this cool website by Iza Malczyk, a polish wire artist. (My parents are both polish born, but thats another story). She has a tutorial for the end cap in the Summer 2007 issue of the Step by Step Wire Jewelry Magazine. The tutorial is also available on her Etsy site. I think this will be the perfect ending for some of my projects (pun not intended).

Like Iza, I've learned a few things from the renouned Eni Oken
Eni has some great tutorials on her site. They are quite reasonably priced considering the many pictures and pages that go with each tutorial. Some are even free!

Dec 27, 2007
what a fun swap!

 This was a SWAP! hosted by the Canadian Beaders swap in Yahoo Groups. The theme was the 31 days of Christmas and involved handcrafted and purchased things. Polymer clay and Beadwork was a big inclusion. The participants were given a partner for whom to create a box full of Christmas related things. Each day involved a project, one day would be a handmade card, the next an ornament in a specific theme such as a candycane or snowflake, an ATC, a snowman.... I received many polymer clay ornaments, ribbons, beads, chocolate, scrapbooking materials. I'd say my partner outdid herself and I feel spoiled! Thanks Heather!
Dec 5, 2007
What are YOU up to.....
Haven't posted for a while because, if you saw my previous post, I was up to my ears in 'training' my new Vista. Finally got it settled some, but still working out a few kinks.
Then there was the 'dusting' and clean-up and bringing out the Christmas Decor.....yeeha!...argggh...first I needed to put up the shrink plastic window insulating stuff on two windows today. Looking forward to a colder winter and trying to conserve energy...then vacuuming behind the furniture and DUSTing everywhere, mopping the floors, vaccuuming the ceilings and corners. Then went shopping, driving 6+hours and I'm pooped, but still need to pack all the groceries away, the family sized meat packages into individual baggies and organize the cupboard with the fully stocked items. Finally, at 10 pm, plop on the couch....and at least one of the daughters decorated a little....oooohhhh how NICE!
What about my other creative outlets!?
Ok...I have to admit, I haven't been claying much. Not at all! Shame on me!
The excuse is a valid one. My work space is limited to one teeny desk right now, especially with Christmas around the corner. VERY LIMITED, almost tearfully so. When I don't have the room, I just can't get anything done! I need a large amount of visual stuff and having things in drawers....ahem, that doesn't work. When I clay, I need my foils, stamps, cutters, tools, papers, crystals, textures, inks.....I have to figure out SOMETHING!! because " Out of sight is out of mind!" That doesn't work. I need visual cues. I need some help! How can I be an artist when everything is packed AWAY.....
There is a small show on Saturday and tomorrow I will have to do a mock-setup, just so I don't have to fuss with it too much when the time comes.....
Nov 28, 2007
I want to work with PC - polymer clay, but instead am figuring out my new PC...
Not without pain or funny sarcasm. I was sooooo excited to hook up my new computer. It'll be faster! It'll have more room! It'll be easier to navigate!
Not! My old Windows ME was a reliable tool for seven years. Some people groaned when they would hear I had an ME, but for me it was easy because I knew it inside and out. I felt like a happy geek!
This new PC, Vista Home Premium, lol...well, it already has issues right out of the box. I now wonder if I should have heeded that funny commercial on TV where the Mac and PC have a mediator who keeps asking "Allow or disallow" and PC says "Allow" several times and then the announcer says:"And PC comes to a sad realization..." ....."Allow". Yup, I already have problems with the Display driver (which is uptodate), error windows popping up here and there and some of my older programs such as CorelDraw 8 don't work at all, won't install properly or things don't get recognized, even though I tried installing it so that Vista 'thinks' it is an older O/S which Vista recommends, ha! Finally got my MS PictureIt publisher 2001 to work that way, but then it IS a microsoft product. Yikes...after a full week I think I have spent enough days trying to figure out what I needed to figure out...not! One would think this new platform was supposed to be easier, not more difficult. Mr. Gates has nothing better to do than 'improving' things that should well enough be left alone. Just when Windows XP with SP2 was getting its legs, lol, along comes a new and improved system.
Can you afford and buy a new and improved program every time he adds something new? or do you want to...lol, there IS a difference. 7 years is really not that long! and I feel guilty taking the bait! We have become such a throw-away society that way. What happens to all the discarded computers? Only so many can be recycled and rebuilt!
Corel wants me to throw away the 10 year old version because they want me to support them a bit by spending another $489 for its full version...and the Drawing program isn't really any different than the old version! Very much the same, except.....the colour Palette has changed. So what I have had to resort to right now...I got the 15 day trial version installed, opened all my files that I used for printing my own jewelry labels such as earring, necklace cards, business cards etc etc and exported them into Microsoft Office , so that I can actually still print them...for 60 days because MS Office is only a Trial version also. Haha on me, eh? Haven't tried installing my old 2000 version yet, haha. I won't have another Corel Program available and its extensions .cdr files ONLY open with Corel. I am stubborn and refuse to give Corel any more money when I feel I shouldn't have to. Instead I still have my Serif Draw which is a Freeware Program from the UK. It works fine, but not quite as many features as my old Corel. I should have saved for another couple of years and bought a MAC. Unfortunately, even though I was patient enough, my reliable ME with only 127mb ram was getting tooooooo slowwwwww and I had to defrag, clean disc, clean temp folders on a weekly basis and reboot countless times....poor thing. (Gosh, now I feel SORRY for my old computer, no wonder they call it PERSONAL computer...am getting personal, lol).
OH, I shouldn't complain so much, there ARE a few pluses for this new one. It has LOTS of storage space. It is light! It has 360 GB for room, but actually ONLY has 250 left because VISTA is such a pig when it comes to taking up room, lol. It is nice and quiet though! And it has lots of free trial versions of programs. Its a trial alright.....
Mr. Gates....now I KNOW why you and your partners at Corel, Adobe and Norton are so rich!!....Haha on me. My final lesson...the cost of upgrading doesn't just involve the Hardware. Oh, how I wish I could have stuck with ME, but only a faster RAM.
Nov 2, 2007
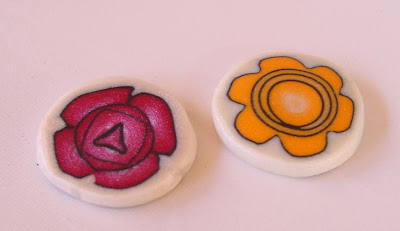
Day 2 for the Chakra Canes
It was day 2 for making chakra canes, but boy oh boy!! was it ever COLD out there today. What was I doing outside? Well, for now my polymer clay making is confined to the 'sun-room' which has no heat and isn't a sealed room, so its like sitting outside with only protection from wind and rain. No sun today, but rain and the thing with the cold...I had to keep my clay in my bra otherwise the conditioning of it would have taken forEVER, lol. Wellllll, it did take a long time because I used my Fimo clays because I have so many of them stocked. Each cane took about 2 bars including black and pearl.
These are the two I came up with, they're not perfect as I worked pretty fast, but reperesent the Solar Plexus and Heart Chakras quite well, I feel. Perhaps you can see the sparkles because I only used Pearl white for the filler. I have no idea yet what I will do with these, but maybe something similar to the Harmony jewelry pieces I make. The next canes will be the Throat and Brow Chakra. The Throat chakra cane shall be tricky as I need to put 16 petals around the outside. But it won't be as tricky as the last one....the Crown Chakra with a 1000 petals!!! I don't think I can do a 1000....will see....


These are the two I came up with, they're not perfect as I worked pretty fast, but reperesent the Solar Plexus and Heart Chakras quite well, I feel. Perhaps you can see the sparkles because I only used Pearl white for the filler. I have no idea yet what I will do with these, but maybe something similar to the Harmony jewelry pieces I make. The next canes will be the Throat and Brow Chakra. The Throat chakra cane shall be tricky as I need to put 16 petals around the outside. But it won't be as tricky as the last one....the Crown Chakra with a 1000 petals!!! I don't think I can do a 1000....will see....


Nov 1, 2007
Clay for pain-relief!
Today was absolutely gorgeous weather. Had to spent a bit of time outside, but no working in the yard 'cause I hurt my back and am stiff as a board! Thought I could undo the kinks with stretches, but instead found I needed help to put on my own socks. Arrrgh! I hate being sick or unable to do things for myself, so was in total self-denial....until the pain started talking!! And unfortunate me, no painkiller in the house other than ordinary shelf-stuff...so I spent some time claying to get my mind off of my back (sounds funny!). It worked for a couple of hours. Made some milifiori canes for what will be a set of 7 Chakra Petals, the symbols for the different chakras. I made Root Chakra and Sacral Chakra canes. The Sacral Chakra Cane before reducing. The Root Chakra reduced and a couple of slices. Tomorrow I plan on making the Solar Plexus and Heart Chakra Canes.


Oct 29, 2007


Taking proper pics ain't easy
Learning to take proper pics isn't easy. I thought it was, but being forever picky and not wanting to spend eons in a photoshop program, lol, welllll...
First I built one of those cardboard photo boxes. That didn't last because the paper inside kept getting crumpled. I looked at professional light boxes online, but spending more than a $100 bucks wasn't very appealing. So I finally bought one of those large clear frosted tote bins and some posterboard to line the inside, all for $12 bucks. I already have 3 daylight lamps for working. They aren't all the same, but they work. I had to fiddle with the exposure level in the camera. First tried EV-.3 and white balance for indoors. Awful! Everything had a blue tinge and very dark, even with all the lights. Finally worked myself up to a EV+1.0 and white balance on Auto. Much better.

Can't decide whether I like the EV+1.0 or +1.3 which is even brighter....What do you think?

First I built one of those cardboard photo boxes. That didn't last because the paper inside kept getting crumpled. I looked at professional light boxes online, but spending more than a $100 bucks wasn't very appealing. So I finally bought one of those large clear frosted tote bins and some posterboard to line the inside, all for $12 bucks. I already have 3 daylight lamps for working. They aren't all the same, but they work. I had to fiddle with the exposure level in the camera. First tried EV-.3 and white balance for indoors. Awful! Everything had a blue tinge and very dark, even with all the lights.
 Finally worked myself up to a EV+1.0 and white balance on Auto. Much better.
Can't decide whether I like the EV+1.0 or +1.3 which is even brighter....What do you think?

Oct 16, 2007
Finished Pieces
This morning my relatives left after a week of visiting. It was hectic with a lot of cooking and outings. We had relatively good weather for this area and it only began pouring again yesterday, so we stayed indoors and I showed my niece how to make some flower necklaces. I also finished a few more pieces such as these ones which includes a couple of the imitative ceramic tiles that I had made a few days ago and also one of the faces:


Oct 12, 2007
Imitative Ceramics in Polymer Clay

Hubby says to me this morning:"Why would you want to make imitate ceramics with polymer clay when its so cheap?!" Wellll...I don't have a good answer for that except that I wanted to try a nice glaze on my face cabochons for beadwork and I don't have a kiln (which IS expensive). I used pinata inks mixed into liquid Kato Polyclay. I dabbed on a little mica powder onto the faces, then coloured 'glaze', then baked and gave the pieces a glossier finish with Fimo Varnish. The effect is a little dimensional and I'm pleased with the result. I only did a scan here and scans aren't showing dimensionality too well...I guess I should get out my camera.

Oct 10, 2007
Inspiring Polymer Clay Artists on the WWW
Blogs seem to be the link that binds artists together. Do a google for "polymer clay Artists" you get 1,130,000 results! For singular 'polymer clay artist' and you get 249,000 results and for "polymer clay blogs' there are a staggering 71,600! Not surprising, Polymer Clay Daily is #1 and is the most popular blog among us. I was, however, more than a little surprised to find myself on the 5th page between the 41st-50th result, quite interesting since I'm a newbie! Feels kinda good, I tell 'ya! :)
I was curious WHO is out there in the blog world and found some interesting Europeans. Just a few listed here that I thought are interesting and have a lot to offer:
Here is a neat tutorial for an Eye Cane by Kerstin (sorry Kerstin....you don't tell us your last name!). She kindly grants permission to link to her tutorial pages. Kerstin has some other interesting tutorials such as a snowflake cane and sanding lentil halves and gives instructions in both German and English!
 Another wonderful artist is Naama Zamir who lives in Israel. Beautiful, beautiful cane work and also lots of tutorials on her pages which are both in Hebrew and English.
 Need to keep an eye out ;-)....there are so many wonderful artists to visit....what a lovely thing to do on a rainy afternoon!
Then there is Parole de Pate who teaches us how to MICROWAVE polymer clay! UPDATE!! BTW...microwaving clay does NOT properly fuse polymer clay. An oven and thermometer is still the recommended method. Many, many wonderful tutorials and work on their blog though. Too bad my time ran out, I need to go cook dinner now!

Oct 8, 2007
More Triangle beads
Made some more mokume gane, translucent with red pinata, gold leaf, copperleaf. Made some triangular beads and carved them a bit after baking and giving them a bit of antiquing.


Oct 6, 2007
I love Pinata Inks
I simply love Pinata Alcohol Inks! They work so well with Polymer clay. Here are a couple of pieces I made by using Pearl Premo clay as the base. Drop random spots of the inks, using a brush to spread, leaving spots of the white pearl. I used small amounts of rubbing alcohol to give a sunflowering effect on the surface. Let it dry and run through 2 successively smaller settings of the Pasta machine, just as you would with a sheet of clay that is covered with gold/copper leafing. It will give a slight crackling effect and the mica of the pearl will add to the chatoyant effect. I use Fimo Varnish to protect after baking.
 I've linked my a recent tutorial on here that I posted in the 'future' from this one...in case anyone wants to see....

 I've linked my a recent tutorial on here that I posted in the 'future' from this one...in case anyone wants to see....
Sep 30, 2007
I guess its Angels!
I've been looking at my angel cards and they have often held a clue for some inspiration. The card I drew is "Practice makes perfect". How true is that! The leaves and triangles matched, so I made some Angels.


Sep 28, 2007
A few more cabs....


A few more cabs, not taxis, but Polymer clay cabachons that is. Donuts too. It was a dreary day to take pics, very dark in the house and not much natural light to be found, but these have so much depth to them. I used a mokume gane with pinata inks and foils, probably my favorite technique.
Sep 26, 2007
Clink!...some more leaves for Fall

A couple of wine glasses I covered with some yummy green Polymer Clay. The one on the left has some mokume gane slices added, the background colour has inclusions. The other glass has inclusions and a few geometrics. Both glasses have Polymer Clay maple leafs ;)
Bookmarks with Pebbles

Since hosting a Polymer Clay PEBLS (Polymerclay Evolved Beach Like Stones) swap with 2 Groups simultaneously and seeing my friend Gera hard at work creating beachpebbles galore, I felt it was high tide, err, time to make more Pebls also. I've been making bookmarks such as these, but also use them on driftwood mobiles.
Sep 22, 2007
Another Leaf turned...officially FALL
Driving to the next town about 180 clips away is sure an inspiration to create something with leaves. So here is my newest Fall necklace. Copper, variegated and gold leaf in a jade translucent polymer clay that has pinata ink worked in it also. The necklace itself is crocheted and 4 strand braided with recycled glass, semiprecious smoky quartz and other beads. Had this at the market today and it received a lot of oo-ahs. I'm very pleased with this. Too bad my camera doesn't pick up the shifting colours and light which reminds me of ammolite.


Sep 14, 2007
Teenier Mermaids
Ok...theses are even smaller than the last. The one on the right is just over 1 1/2inches and the one on the left....well you can see by the Quarter, and her face looks a little too old for her size, lol. The bead holes run horizontally. Made a pilot hole initially and drilled larger after baking. Bill asked if I could make them smaller yet!!! Now there is a CHALLENGE! I'm not a doll maker either, so faces aren't my strength.

Landscape Polymer clay Cabochon
Well, here it is...finished. One of the cabochons from a few days earlier (Scroll down to see two of them). Not too happy with the picture, but too be expected with scans. The problem with scanners is that once you put the lid down...you never know how the fringe or various beads will lie, they usually move. Maybe I should try a box instead of the lid next time (now there's an idea!) My camera can't hold a charge anymore....mental note to add a battery to shopping list.
The clasp is made from endcaps that I covered with faux bone polymer clay and inlayed with abalone shell fragments that are then glued into place with cyanoacrylate. The endcaps I glued onto the 5 mm thick leather cord with E6000. Love that leather cord!! A few years ago I ordered it by mistake, but I'm sure glad to have it now because it makes awesome neckcords that are able to hold their shape a bit.

The clasp is made from endcaps that I covered with faux bone polymer clay and inlayed with abalone shell fragments that are then glued into place with cyanoacrylate. The endcaps I glued onto the 5 mm thick leather cord with E6000. Love that leather cord!! A few years ago I ordered it by mistake, but I'm sure glad to have it now because it makes awesome neckcords that are able to hold their shape a bit.


Sep 12, 2007
Watercolour Polymer Clay Boxes
These boxes are made from watercolour paper, then trimmed with Polymer Clay and/or beaded. The images on the inside are either my own miniature paintings that are transferred onto clay, or I use other images or interesting little charms and crystals. The boxes measure between 1 1/2 " tall to 4" and I'm in the process of trying larger "Dreambox" types.


Landscape Polymer Clay Cabochons

Had fun making these today. Painted onto pearlescent polymer clay with pinata inks and then glazed with Kato Liquid Polyclay. These will get a beaded bezel and either made into pins or necklaces.
Mermaid Bead

Bill asked me to make a Mermaid bead. He said I used to make the cutest little mermaids, but guess what!...I don't even remember!! Well, I made this one today. She stands 2 1/2 tall and apparently she is about twice the size than she should be. She only took me 10 minutes, but making one smaller shall prove to be a challenge.
Subscribe to:
Posts (Atom)
