Showing posts with label crackle. Show all posts

Feb 20, 2013

New Tutorial - Ammolite, Batik Veneers and more

Am happy to announce that my latest tutorial is finally finished. I know some of you have been waiting on this one for some time. Thanks for being so patient!
Ammolite Crackle
This one is packed…24 pages and almost 100 photos. I couldn’t decide on an appropriate ‘short’ title since this tutorial is so packed with techniques, tips and more.
If you're not familiar with Ammolite, it is one of the most wonderful gems, full of flash and fire and just about any color you can think of. It is the fossilized shell of the extinct sea creature Ammonite.
I've divided this tutorial into different sections. You will learn to make:
1. Crackle and Batik Pattern Veneers (a part of
the Batik & Shimmer technique)
2. "New Crackle" technique (one method)
3. Faux Ammolite
4. Uniform color or metallic edging for veneers
5. Faux Bone and Raku Pendants
6. Texturing front and back of pendants
7. 3 styles of polymer clay Bails
8. Bezels for embedding tiny stones or chips of
clay
9. Variations of veneers and pendants
10. Tips and much more.
The Tutorial can be found in my Etsy and Zibbet shops.

Aug 9, 2012

Summer Bracelet Fun

I’ve been making and selling a few bangles and none received more compliments than the one I chose to keep for myself. So I’ve decided to share it, in the form of my latest tutorial.

This tutorial is fold as in 2 parts. First I show how to create the crackles and craze with the full tutorial of "New Crackle", then second, how to create round and flat round elasticized bangle bracelets. The tutorial will shows a modification of the crackle. Nothing gets wasted when you use the crackled veneer for other projects and then use the left over bits to create these types of bracelets.

1-Collages2
The Bangles are unique in that the 2 halves interconnect with elastic. You can also create these bracelets with other veneers such as Mokume gane, milifiori canes or my Batik technique which I think is a lot of fun.

This 15 page tutorial has more than 40 photos as guidance with the detailed step by step.

I’ve listed it in my Etsy, ArtFire and Zibbet, so one can choose their preferred Market place. There is a bit of a bonus with a percentage discount on ArtFire (Comment and Patrons). The other markets don’t offer this yet.

Ok, but what about if you already have the ‘New Crackle” Tutorial? Well, you could just create your own bangles I suppose, lol. I was thinking of offering just the bracelet as a project part, so one can use their own technique along with it and just learn my tips and method, but it gets to be a bit confusing when listing. This was the case with my Batik Flower tutorial, where I offered a tutorial with the technique and the project and then the project alone. I sold very few of the project alone that I stopped offering it.

I could use some opinions on this…

May 22, 2012

Watercolor Crackle Bangle and Ammolite

Two new upcoming tutorials!
actually 3, but the third one is a multi-faceted tutorial and is taking me a bit longer, mainly because I’m writing a couple of versions of expanding stretch bracelets, one for polymer clayers and the other for beaders. I’ll post more on this soon.
The next upcoming tutorial is using the watercolor bead method with my ‘New Crackle technique’ in combination. This is a sneak peek at one of the bangles.
DSC07569DSC07558
And then there is something a bit more exciting, another new technique for Imitative Ammolite. Crackles of golden, red and green chatoyancy. When held at angles metallic shifts…
DSC07568DSC07565
cha·toy·ant/SHəˈtoi-ənt/
Adjective:
(of a gem, esp. when cut en cabochon) Showing a band of bright reflected light caused by aligned inclusions in the stone.
I might as well throw in one of my newest cabochons in new colors…I’ll be posting some of these for sale in the next couple of days. Busy busy busy…lol
DSC07555

Apr 19, 2012

Crackle Focals and 52 Earrings a Year #15

The polymer clay focals I made a few days ago, I assembled them into this necklace and earring set. I’m entering the earrings as my #15 which was an Easter Theme. While mine aren’t bunnies or eggs nor anything remotely religious, I feel the floral aspect and colours could be interpreted as Easter.
DSC07290DSC07292
I’ve also made a few other pendants with my New Crackle. As you may have heard, this crackle does not leave any paint on your clay, but only the visible cracks. Here is a nice close-up…

DSC07302
I’ll be assembling these into a similar necklace and earring set as the one above.
DSC07294

Apr 15, 2012

Toy of the Week 2: Seamless Cutters and Viva Decor part 2

Sorry for the long title…not sure how I can shorten that, lol.
Hopefully no one is too mad at me for having posted my dislikes about the new (to me) cutters. I edited in my last post and added on the bottom of the post.
Part 2. I like the Viva Decor Inka Gold very much. I hydrated some of the drier paints, but also find that when I moisten my finger a little bit, it immediately puts paint on my finger when gliding it over the paint. They remind me a lot of creamy water colours or eyeshadows. This sheet below, I had mixed up a shade of green clay, ran it through the pasta machine, then ran it through again with a texture (one of Helen Breil’s beautiful patterns) and coloured it with my finger. Although you can layer the paints (and they layer beautifully), after each colour I dip my finger into some water and wipe it clean with a rag. Paint comes off really easily, although I now have some paint under my fingernails. I need to apply new nail polish anyway, ha. Anyway, the coverage of these paints is just fabulous.
DSC07277
I find that you can do as many layers as you want and with each layer, the application gets thicker and bolder. You can see this from left to right. I had just a hint of texture on this clay and on the left you can see it as sort of a painted wash in the crevices. This paint can actually be watered down as well and applied as a wash instead of a wax.
DSC07280
When dry, you can achieve a nice crackle with this also. Hey, you know how much I like to crackle, right? lol. I think this will crackle even better if I put on another coat after it is dry and then crackle…I’ll try this next…but this is with one coat and pretty good.
DSC07282
After I applied paint on this piece I stamped it (Tonja Lenderman Clear stamp)
DSC07281
Ok…enough play for now…I think I’ll create something with these sheets. So I decide to try the sanded seamless cutters. I use the teardrop shapes. I’ve already begun assembling some of them. I’ll be making a drop necklace and some earring with those.
DSC07287
And a close up of the edge for the teardrop. Much better, but I still had to smooth the clay a little bit with my finger. I rather like the shape now. I used a lime and teal Viva Decor Inka Gold on these. I normally work in much darker colours, but thought I should try a little ‘lighter’ for Spring. Plus green goes so nicely with the popular Orange for this season.
DSC07289
I’ve embellished this cabochon  and the flowers on the teardrop with a little Swarovski Crystal. I’ve enjoyed using crystals ever since I started claying way back in the late 80’s. You see those little balls of clay on my piece above? I roll a ball, insert a blunt knitting needle to make a hole. This becomes the bezel for my rhinestone. I insert the stone and use a cartridge-less pen to set the crystal into the bezel. The clay pushes a little bit over the edges of the stone, so I may not need glue. I must be certain that the clay is around all of the edge of the crystal though because otherwise I’ll need to use some glue. Don’t use cyanoacrylate (Zap-a-gap, Krazy Glue etc.) on crystal or glass as it will frost them. It is better to use an epoxy.
DSC07288
After I’ve assembled these…what shall I do next? I have quite a few more toys…Do you want to see?? lol

Mar 27, 2012

Tentacles and out of the box

I’m really in the mood to make some non-regular Earrings, ear hangers, gauges, posts, clip-on type. Although I like any style of familiarity when it comes to earrings, I feel the need to get out of using the same style of hooks and just dangling something from them. Those have become too routine and I need to get out of the box and explore a bit more. Anyone else feel like that?

Just recently when I made these dragons #8, my mother who is turning the big seven O this year requested to please send them to her. I asked if she really would want to wear these and she replied “oh YES!” I already had someone else request them, so made another pair. Then she saw these and wanted them too. She still looks good with her auburn long hair, so yes, I can imagine them, but requested a photo…not sure if she’ll let me post it here tho, lol.

So, after my daughter snagged these earrings, I went about and created this similar pair as well as the next with faux glass droplets which is number 12 on the 52 earrings a year challenge. Both use my crackle technique.DSC07179

DSC07180

The next is #13 and has a Theme…”Twigs” and a few people have already begun to post them…so I better work on that, although the above pair looks kind of twiggy.

Mar 21, 2012

Happy Spring!

It’s officially Spring, but can’t tell by our weather…we had snow today. Wondering why we couldn’t have had this on Christmas, lol. Actual Winter seems to be starting later and later, although I heard Saskatchewan had summer temps of 26 Degrees. Weird or what! We’ve been having Hurricanes and pelting hail, then sunshine, all in one day but the only heat is from the fireplace…

Anyway, about winds…the last couple of days were an absolute whirlwind, since my newest Crackle Technique was Featured on Polymer Clay Daily! The result was just like the title says! Absolutely amazing! Thanks Cynthia! lol

polymerclaydaily

I wanted to post these earrings sooner. They are my #11 in the 52 Earrings a Year Challenge on Flickr. The theme is ‘Spring’ and fitting for this 1. day thereof.  Wondering which ones to submit??

DSC07176DSC07177

Feb 10, 2012

Crackled Cane and Funky Tentacles

My crackle technique is not ordinary. It doesn’t cover up or hide the original surface of polymer clay like other crackle mediums or Gold Leaf for instance. Applying it to polymer clay and rolling the clay through smaller settings on the pasta machine will crackle the leafing, and the only original part of the clay showing through will be the cracks.

Here is an example of what I mean. I made a simple bullseye cane and applied little slices to the clay sheet. I rolled it smooth and then applied the crackle medium. When finished you can still see the canes. You can do this with Mokume gane, or my Orinendo, the Faux Ceramic or even Dichroic as well. I think this would make some interesting beads. You can find my crackle technique tutorial here and the other ones are there as well.

DSC06973

I made these earrings and necklace today. This is Earring set #7 in the 52 Earrings a Year Challenge. i crackled red clay and added some wire. Looks like I want to keep them. If you look closely you can just barely see the Hearing aid behind my ear and a wire running inside of it Open-mouthed smile .

I’ll be making more of these Funky Tentacles. I have a lot of ideas burning…

DSC06975DSC06981

This is a matching necklace and more earrings…more on the way…

DSC06980DSC06982

Close up

DSC06983


Kind of a strange style for me, but I like it, sort of like a coral…

Feb 6, 2012

Faux Glass Et cetera

So many things are going on my polymer clay studio right now. It’s one of those times where I wish there were two or three of me. As you know I love to experiment and am always challenging myself. I’m analytical and a problem solver, and when a mystery pops up, I’m confronted with the compulsive need to find a solution. ‘Is it possible?’ I keep asking myself. This quirk maybe to a fault because lately, every alternate day when it’s my turn to cook for the family, the meals are quick to prepare Stir fry, casserole, pasta… meal planning is out the window as the mad scientist would rather spend all day dabbling with a little of this and a little of that. Thankfully my cooking still gets compliments and my daughter helps with dishes.
Ok…some new stuff…
Faux Glass…It’s still in the experimental stages, but this may be an upcoming tutorial. Wondering how much interest this would generate? Here are a few pieces. The very light blue set…one is glass the rest are faux. In case you are wondering, the one on the left is the real piece. I think I managed to get the colour realistic enough. Funny thing is when photographing light coloured or see-through items, my camera picks up the bluish tone rather than the white background. My white balance isn’t quite right and my older Sony only allows for Indoor, Outdoor or Auto, but the colour of the glass is this…
DSC06947
To show the difference in translucency, I used a Ring to lean them against. The first piece is real glass, the rest are faux.
DSC06954DSC06951
DSC06952DSC06953
DSC06955
I made a few of the tear drop beads in these colours
DSC06945
I felt I should get a few more pieces of jewelry done or at least some components, so made this from the Evergreen sheet I had left.
DSC06939
DSC06940
Then I got to work making a burnt orange crackle sheet. I made the Ring from above, some earrings and really like how the crackle reflects. Straight on there is no glimmer, but held at angles there is.
DSC06943DSC06944
Some of these close up photos were taken with an attachment that I got for my camera. I have an older Sony style camera that has Macro ability, but not nearly enough close up capability as I would like. I’ll blog about this in my next blog, it’s something that can fit virtually any camera and is super easy on your wallet. Stay tuned…
Until then, drop me a comment…

Jan 29, 2012

Tina’s Crackle–New Technique

Is finally in a tutorial. I had to find a material to achieve this crackle and found several that work and they are easy to find, promise!

24 photos, 8 pages.

You can find it on my ArtFire and Etsy. I only list one at a time on Etsy because of their listing fees, but there are plenty on ArtFire.

Recently Updated

Jan 19, 2012

Anything is possible…

Or so the saying goes when one looks positively at things.

I’ve had a lot of things on my mind as you know from my previous post, so haven’t been able to produce or be very creative. But it’s been since November that my muse went on vacation and has left me sitting in my studio with piles of ‘to do’ lists pinned on the board.

I’ve made a few ‘little’ things but nothing substantial and this bothers me. I’m supposed to work on some orders, but you know, I’m tired of making things that I’ve been steadily producing since 2000. That is 12 years! You can say that I’m just bored with it and am procrastinating badly, but what to do when the shops keep asking for the same stuff! because it sells! I want to sit and design something new, something 2012! Maybe something Mayan tribal with an Oceanic flair, lol. …but…mmm….this years trend are layers of chains, roses and flowers…and my muse calls me from overseas and says ‘chuck that thought aside, create your own trends’.  Artists are supposed to do this, right? I might use some of that Pantone Tangerine Tango tho and I envision some Coral, Carnelian with hints of Rose quartz and Tiger eye…but I digress from what I really want to tell you!

So, this afternoon I sat playing with some surface treatments as I’m also supposed to work on some buttons and while this clay sheet is a little dark, I think I’ll be able to reproduce this with a lighter colour. I had a scrap piece of green clay with copper and gold flecks in it, rolled out flat, sitting in front of me at my desk. As I stared at it, and it, at me in return…the question popped into my mind “Is it possible?…”

Is it possible to create a crackle on uncured clay without the use of metal leafing? without a 2 part crackle medium? without heating the clay and causing it to crack? without Future Floor polish which takes so long to dry?? mmm…

YES! it is!

…this is the result. I’ll share more soon…

tina crackle

Nov 2, 2010

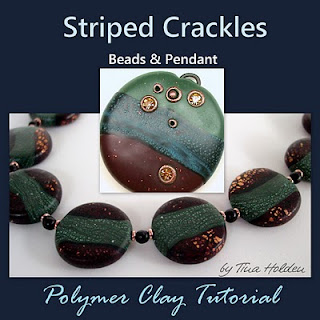
Polymer Clay E-Book - Striped Crackle Beads and Pendants - Tutorial

Shameless self-promotion, but what better way to announce that I have another polymer clay tutorial finished. So I am blogging about it here.
I tried counting the number of tutorials I have written (including a few beadwork and wire tutorials), but am having a hard time counting. I think this one will be the 33rd.
What is this latest tutorial about?
Striped Crackle Beads and Pendant. Essentially it is a 2 in 1 tutorial that is broken down into several parts. Learn in detailed guided step by step to make flat round beads with inclusions and a crackled banding and how to achieve fingerprint-less surfaces (found out that google doesn't like the word 'fr-ee' and wouldn't let me post that in my description, lol).
The bonus with this tutorial is to create a slight variation of a matching pendant that has accents and embellishment of swarovski crystal. You will also learn my method on inserting stones without the use of glue.

The tutorial has 51 photographs, 45 steps, and 17 pages. It's in my ArtFire Shop.


Apr 9, 2010

Polymer Clay Batik Bracelets - Tomato Puree

I completed my challenge from yesterday. Red, white and black polymer clay tile bracelet in my Batik Technique. 
The red turned more into the Pantone 2010 Tomato Puree than true red and also picked up a few yellow/orange highlights. In some places the red and black are crackled and there are red metallic highlights here. I like this effect. I'll try some other colours next.


Mar 30, 2010

Polymer Clay Batik - Butterflies in Flight

I'm still very excited about my new polymer clay Batik and Shimmer technique which creates a batik like effect over shimmering clay. Again, I use no pearlex or gold leafing, although the latter can be used. Pearlex can enhance any bezel added around a pendant. Depending on the textures and colours you choose, each creation will look  unique and different and that is what I like about the faux batik. It is possible to recreate batches though. Does this make you curious? I hope so, lol.

Anyway, I'm very pleased that Arlene of Harrison Hollow Designs has allowed me to share her creation of using the Batik Technique. I love the spring colours. Arlene has this gorgeous necklace for sale on Etsy.
 If you are pleased with this technique and have a photo or link to share, please drop me a note.


Feb 20, 2010

Polymer Clay Bytes! - Turtles

Well, these Polymer Clay Turtles don't bite, but some have gears. You know those wind up toys? My daughter put one in my stocking for Christmas and been thinking of trying that with polymer clay, but the gears those toys come with would in all likely-hood melt before making it out of the oven safely...
Anyway here are a few turtles, some with resin, some with glass...
Related Posts Plugin for WordPress, Blogger...