Showing posts with label Tutorials. Show all posts

Mar 22, 2017

Silkscreen + Chalk + Ink + Liquid Polyclay = Faux Ceramic

I was just going through my photos on my computer and while I had posted this tutorial on Facebook, I completely forgot to post it here. It’s not my usual style for a tutorial, but made it as short as possible. If you aren’t into making Christmas or Easter Ornaments, this technique can be used for plenty of other projects including Sun Catchers, Pendants, Bracelets, Boxes etc.

I’ve been making silkscreens for more than 10 years now and they have become very popular for use in polymer clay. Here is one of the earliest techniques I developed using chalk.

Silkscreen + Chalk + Ink + Liquid Polyclay = Faux Ceramic. Enjoy!

For my Silkscreens, check out the nice variety in my Etsy

DSC00030 ornaments2

Tina Holden Snowflake

Snowflake Tute1

Snowflake Tute2

Snowflake Tute3

Aug 4, 2016

Silkscreens, Pan Pastels and Chalks

When I began to make silkscreens for polymer clay about 10 years ago I never dreamed they would become so popular. The late Gwen Gibson, a Pioneer in the World of Polymer Clay, innovated the use of silkscreens and etching plates with Polymer Clay. Gwen was generous and I was fortunate to chat with her on a couple of occasions. Although I also use acrylic paint, which is the medium Gwen had primarily used with silkscreens, my passion has always been Mica. I then added Chalk and Pan Pastel. I began using Metal Pulvers in 1989 and then moved to the less toxic Mica. Back in 1989 no one told you about wearing a mask when using the pulvers or fine metal shavings and when Jacquard introduced Mica powder for Card making, scrap-booking etc (which we also use in make-up and eyeshadow) this wasn’t necessary. If you use a brush and really go at it, you might want to wear a mask, though. I primarily use my fingers to apply.
For many years I sold this tutorial, but have decided to share some of my older tutorials as I develop newer ones. Enjoy!
“Low Relief Stone Rubbings”
by Tina Holden (2008)
This is an older tutorial, but still valid. I just reformatted the layout of the text. Here I will teach you how to create 'low relief stone rubbings' on Polymer Clay. These stone rubbings are based on grave stone rubbings, but aren't as morbid. Instead you'll discover various ways and possibilities with this technique using silkscreens or stencils.
clip_image001
Tools:
● Tissue blades, rigid and flex (flex is optional)
● Pasta Machine (Atlas 150 used in examples)
● Needle tool or knitting needle
● Silkscreens or stencils
● round, oval or square cutters (optional)
● Flat soft bristle paintbrush
● Oven
● Baking tile or glass
● White unlined paper or card stock to bake on
● Thin Foam texture sheet or other suitable texture such as silken fabric or tulle
● Armorall as release agent
● Baby wipes or Windex for clean-up
● gloves (optional)
Materials:
● Premo! Polymer Clay: 1 small block each of white, translucent or frost, pearl and either Turquoise
Blue or Sea green (note: Sea Green is no longer available)
● Fimo Gloss or Fimo Water based Varnish
● Decorator Chalks (or pastel powder eye make-up in cobalt blue, bright green and yellow) or Pan Pastels in similar colours
● Jacquard PearlEx Mica Powder in Turquoise (optional)
● Embossing powder in green, blue or verdigris
The clay I prefer is Premo but you can use any of the other brands if you prefer, although for jewelry I don't recommend Sculpey III as it is too brittle for thinner pieces. (note…this is the older Premo packaging)
clip_image003
Preparing the Clay base:
Step 1. Mix ½ block each of white, translucent, and pearl with ¼ block of turquoise or sea-green. Roll through Pasta machine on thickest setting (#1 on Atlas)
.clip_image004
Step 2. Blend clay with 1 tsp. of embossing powder.
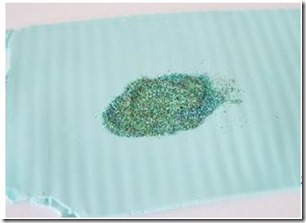
clip_image006
Step 3.Blend clay with ¼ tsp. of Turquoise Mica Powder (optional). Roll through pasta machine on thickest setting (#1 on Atlas).
clip_image008
Step 4. Cut sheet in half and lay one half aside. Prepare Silkscreen by using a little Armorall on finger and spread over the 'rubbery' side of the screen. This will prevent the fine mesh from clogging up with clay. Roll out on smaller setting, next size down, #2 on Atlas.
clip_image009
Step 5. Stack Silkscreen – shiny side down onto prepared clay sheet, with foam texture or tulle at backside of clay. Roll through pasta machine on thickest setting (#1 on Atlas).
clip_image011
Step 6. Peel off Silkscreen and texture. You should get a low relief or stamp-like texture on your clay. (I’ve darkened the first photo so you might be able to see the texture a little better)
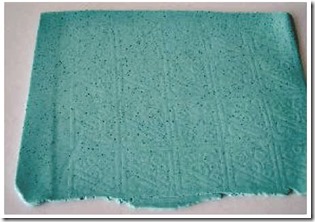
textured clay dark
clip_image013
Colouring the relief texture:
Step 7. Lightly cover finger or gloved finger with chalk and gently stroke or rub
Colour onto your textured sheet. Don't apply too much pressure as you will want to keep your texture intact. Start with one colour and apply in various places on the relief. I used green chalk here.
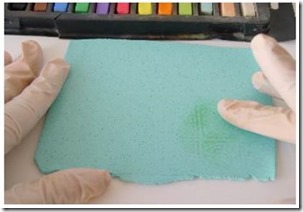
clip_image015
Step 8. Then apply another colour/s. Second colour I used is blue, third I used yellow. Cover entire sheet until you are pleased with the effect. You may have to go over the surface with more powder to darken it. It doesn't really matter if you apply some green over the blue, it'll actually turn it into a nice teal.
clip_image017
Step 9: Take sheet that you laid aside earlier and roll out at #2 setting and then texture one side with foam texture or tulle. Remove foam or tulle and carefully lay your coloured relief rubbing sheet onto the sheet you textured (texture side down), avoiding trapping air bubbles.
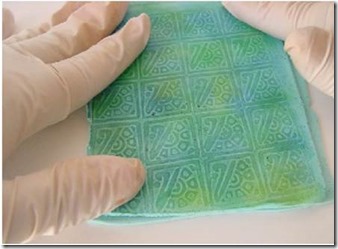
clip_image019
Step 10: Trim away rough edges. Any of the coloured scraps put aside to roll into matching beads later if you want to.
clip_image021
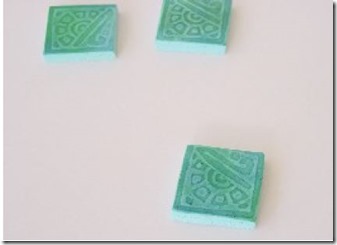
Step 11: Cut into tiles for Bracelet, Earrings, put holes where you need them. Other creative uses would be for coasters or tiles.
clip_image022
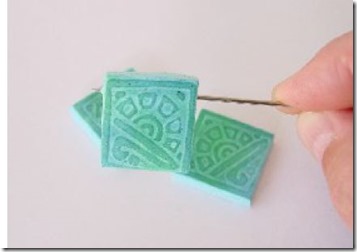
Step 12: When putting in holes horizontally, Hold the tile as shown and maneuver a thin needle or needle tool through the tile, just until it peeks through the other side. Complete the hole by pushing tool through from opposite end. For a bracelet you'll need about 5 to 7 tiles, it depends on what size beads you use as spacers, on wrist size as well as the tile size. I do have a tile bead tutorial on both my website and Etsy (links below)
clip_image023
Step 13: Rub some chalk or pastel on the sides and back of the bead tiles also.
clip_image025
Step 14: Bake, Let cool and varnish, then string with elastic. Tie knots and hide knots inside large-hole glass beads.
clip_image027
Note: you can roll your unbaked/uncured stone rubbing through smaller settings to lightly stretch the design which I did with the earrings here.
clip_image028
For variation try other colour combos and other patterns.
Variation: mix a different colour clay base such as ½ ecru, ¼ translucent, ¼ pearl, ¼ raw sienna and use chalks in brown and orange. Always use a light colour clay base to bring out the colours of the chalk.
Have Fun creating!!
Tina
For a variety of silkscreens, molds, tutorials etc…
My Etsy: https://beadcomber.etsy.com


Jul 29, 2014

Gilded Paths Surface Techniques

I finally finished another tutorial after starting quite a few and not finishing them…yet, however…

Collages4

The tutorial guides you with 49 steps, 58 photographs and 18 pages which includes a Resource list at the end. Use a variety of simple surface techniques as a foundation to add onto with the use of stamps, textures, mica pearls, chalks etcetera. The tutorial also offers plenty of tips to incorporate into your own pieces. Create sheets of clay to use in various projects such as to wrap pens, crochet hooks, bangles or as journal covers, to create buttons, beads, pins, jewellery etcetera, or whatever you imagine. This project is technique based, so the projects are up to you. Here are some examples of easy works that I made using these techniques which you can leave as simple or enhance as lavishly as you want.

DSC00012DSC00016

DSC00006

The projects are up to you, but here is a way to make quick ring dishes with some of the treated sheets.

2014-07-24 12-17-29.0722014-07-24 12-17-43.625  

2014-07-24 12-18-32.0162014-07-24 12-22-29.945

2014-07-24 12-22-43.6122014-07-24 12-25-30.338

2014-07-24 12-28-43.4072014-07-24 12-29-00.125

I stacked two sheets, cut a large circle. Molded on a small glass ball. Cured in a dish of sand or on an oven safe nylon cutter. Voila!

You can download your copy of Gilded Paths Techniques on my Etsy or purchase it from my Zibbet shop and I’ll email you the copy shortly after.

Mar 2, 2014

Rigid and flexible molds for Polymer Clay

I use both rigid and flexible molds. Flex molds are becoming so popular and they are certainly easy and fun to use. One or the other may not necessarily be better  however. Depending on use, a rigid mold can sometimes give better and cleaner results. The rigidness of a mold allows for more control and prevents the design being molded from getting stretched and distorted. Flexible molds are great for when the item is rounded, like a button for instance. Rigid molds are impossible to use for a rounded object like a sea urchin that has a bit of a curved underside. In this example you can see the advantage of being able to stretch a mold to pop out a 3 D item, without distorting the curvature and details and you can virtually turn the mold inside out.
20140302230134(1)20140302230134(2)20140302230134(3)
Flexible molds do have their limitations however, in that it is difficult to create texture plates with them. If one has a large surface area to cover such as creating a 4 x 5 sheet, for example, it’s pretty much guaranteed that one will either end up with an unevenly textured piece, that is some areas will be more deeply impressed and others not enough and some of the details may look stretched. Even if one is successful in creating a texture plate with silicone rubber, creating a positive from such a large mold is difficult as the rubbery texture will shift and distort the image you are trying to copy. Another limitation with the flexible nature of such a mold is that if you are trying to create an equal front and back for a pendant, the stretchy nature of the mold might cause one to end up with 2 slightly different sized pieces.
Here is a short version tutorial on how to create a 2 sided item using a rigid mold.
clip_image002 Materials: 
  • Polymer clay such as Fimo which is my new /old preference, but you can use any of the polymer clay brands.
Tools:
  • · Tissue blade
  • · Rigid mold made from polymer clay
  • · Water
  • · Soft or absorbent brush, or small spray bottle for water
  • · Rubber chisel blending tool
  • · Needle tool
  • · Small metal spatula or exacto knife
  • · Texture such as coarse sandpaper or rough craft foam
  • · Small textured bead or stamp to hide seams
clip_image004 Step 1: Spritz or brush your mold with water. If you are going to use Fimo to cast from the mold, then do not use water as it will make the Fimo sticky. Use corn starch instead.
clip_image006 Step 2: Condition clay, roll into ball and press into the mold. Starting in centre of clay press outward to edges of mold.
clip_image008 Step 3: Use tissue blade starting at about centre of mold and slice away excess. Use the edges of mold as a horizontal blade guard or as an indicator of how much excess to trim. Hold the blade as horizontal as possible as not to slice into the mold. It’s kind of like slicing multi levels of colour clay for mokume gane.
clip_image010 Step 4: Turn the mold 180 degrees and slice away clay excess on other half.
clip_image012 Step 5: Using your thumbs, push the clay toward centre of mold or away from the edges of the mold.
clip_image014 Step 6: To remove the clay from the mold, press onto coarse sandpaper or a coarse craft foam texture.
clip_image016 Step 7: Mold should lift away, by causing the clay to stick onto the texture, but if it doesn’t…
clip_image018 Step 8: …you can also use a small metal spatula or needle tool to carefully lift the edges up and then the molded item is easier to remove.
clip_image020 Step 9: Create another piece as before and then mount the 2 pieces together matching the edges.
clip_image022 Step 10: With a rubber chisel tip you can easily blend and smooth seams. You can also use your fingertips to gently pinch the largest seam together first and then use the rubber chisel for the finer details.
clip_image024 Step 11: Seams won’t then have any of the texture. To camouflage you can create a similar texture by using the sandpaper to impress a little bit of texture over the seam, use part of the mold itself, or…
clip_image026 Step 12: If you have any metal beads with an interesting texture that matches, you can use this as a roller on the seam.
clip_image028 Step 13: This pendant is done. All it needs is a hole for stringing and a bit of colour. One of my favourite method is to use mica or metal pulver on black for an antique metal finish. Of course you can choose any colour you like.
Find my latest molds, both rigid and flexible in my Etsy shop
WWW.beadcomber.etsy.com

I’ve added a variety of molds to my shop including this Raven Thor Hammer Pendant mold. There is another hammer, a Sea Horse, Mermaid, Egyptian Themes and much more. I’ll be adding more tonight!
Related Posts Plugin for WordPress, Blogger...