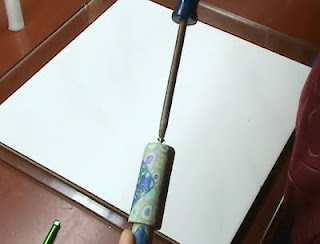
In the meantime managed to make myself a necessary tool - a handle for my Makin's extruder. I found the current 'stick' is hard on the wrist and I even managed to injure myself with a nasty gash while the screw was off. I should warn you...do not operate the Makin's extruder without the screw cap in place, one slip is all it takes.
Quickie Tutorial for Makin's Extruder Handle:
While I did get inspiration from a couple of sources...we polymer clay addicts look for them everywhere don't we...the pasta machine handle (since it has a spinning handle), a tampax tampon (ahem, the cardboard!), the toilet paper dispenser plastic thingy, the biggest inspiration came from Ritzs who posted on Polymer Clay Tutor (in the comment section). Her idea of a handle is just ingenious! a broom stick dowel and a plastic cotton spool reel. Thanks Ritzs wherever you are!
So, to make a handle adapter, you need polymer clay (scrap will do), waxpaper or teflon baking paper, bit of tape, two washers, a screw, drill and your regular polymer clay tools of blade and pasta machine. Sorry the pics are a bit dark as I did this at night-time.
First roll out some clay into a log or snake, about 4 inches long and 5/8" - 3/4" thick. Bake, let cool. Wrap one half of it with a layer of wax or teflon paper. You'll want to wrap it at least 1/16th of an inch thick as you'll be making a tube that fits over it. That tube needs to spin freely, so don't want to fit it too tightly. Tape the paper.
(Ignore the tube standing on the tile for now, that is actually the next step) Anyway, next you need to roll out a rectangle of clay on your PM at largest setting, measuring 2 inches wide. Wrap this around the wax paper on the hardened clay log. Trim ends and smooth. Cut a circle shape and attach to the wrap end as a cap. Smooth and remove from hardened log. Bake standing on cap. Let cool.
Test fit over your log. The log needs to be drilled with a drill bit about the same size as the Makin's green handle. You'll notice that the Makin's handle pins have had their ends crimped flat so they won't fall out of the crank hole. Don't drill your clay that big, only as big as the round part of the pin and don't drill all the way through the clay log either, about 1/8" short of drilling through. I could go into details here, but just take a guess. If you do go through...you might need glue. You will also need to pre-drill your log end to fit a 1" long screw. Drill the hole slightly smaller than the width of the screw for a tight fit. Drill the handle cap end the same size as for the Makin's pin (you can see that cap in the previous photo).
To assemble, place a washer over the pre-drilled screw hole on the log end, put handle cap on, add another washer and insert screw. Screw should be very loose in the washer, but not as loose as for the screw head to fall through. Fasten, not too tightly, you want the handle cap to spin freely. Finally, attach onto the Makin's pin. May require a bit of pushing, should be a nice tight fit, otherwise, did I mention glue? I like to avoid gluing as it's messy and takes time to dry.
Here it is assembled...
test drive...wroom wroom
Also stores like this...
Have fun!!...(edited) and if you want to buy the one I posted on my ArtFire...I just listed one and includes shipping.


.JPG)

.JPG)
.JPG)


.JPG)

.JPG)
naaa....what an idea!!! I will realize mine right now, this is so great! Thank you so much for sharing!!
ReplyDeletexo from Italy
Leila
Thank you for sharing! What a great idea! -Jackie
ReplyDeleteGreat idea Tina! I loved Ritzs' idea when she presented it in the comments at my blog (thanks for linking to it btw).
ReplyDeleteAs many of us who work with our hands get older, the more we find mobility issues slow us down. Adaptive tools like this not only relieve the physical strain, they also support our mental health, as it keeps us able to do the art that we love!
Love your version. Quite classy looking too! Could get all fancy with it if you wanted to. Covering it with millifiori and what not. Thanks for sharing!
yes, definitely makes art more enjoyable when one doesn't have to struggle with tools, meanwhile taking pressure of ones wrists and fingers from overuse. I also cover these with milifiori. I put some up in my Etsy and Artfire and the one above has extruder cane on it...
ReplyDelete